Instance Segmentation

Note
🔥 LightlyTrain now supports training DINOv3-based instance segmentation models with the EoMT architecture by Kerssies et al.!
Benchmark Results
Below we provide the models and report the validation mAP and inference latency of different DINOv3 models fine-tuned on COCO with LightlyTrain. You can check here how to use these models for further fine-tuning.
You can also explore running inference and training these models using our Colab notebook:
COCO
Implementation |
Model |
Val mAP mask |
Avg. Latency (ms) |
Params (M) |
Input Size |
|---|---|---|---|---|---|
LightlyTrain |
dinov3/vitt16-eomt-inst-coco |
25.4 |
12.7 |
6.0 |
640×640 |
LightlyTrain |
dinov3/vitt16plus-eomt-inst-coco |
27.6 |
13.3 |
7.7 |
640×640 |
LightlyTrain |
dinov3/vits16-eomt-inst-coco |
32.6 |
19.4 |
21.6 |
640×640 |
LightlyTrain |
dinov3/vitb16-eomt-inst-coco |
40.3 |
39.7 |
85.7 |
640×640 |
LightlyTrain |
dinov3/vitl16-eomt-inst-coco |
46.2 |
80.0 |
303.2 |
640×640 |
Original EoMT |
dinov3/vitl16-eomt-inst-coco |
45.9 |
- |
303.2 |
640×640 |
Training follows the protocol in the original
EoMT paper. All models are trained on the COCO
dataset with batch size 16 and learning rate 2e-4. Models using vitt16 or
vitt16plus train for 540K steps (~72 epochs). The remaining ones are trained for 90K
steps (~12 epochs). The average latency values were measured with model compilation
using torch.compile on a single NVIDIA T4 GPU with FP16 precision.
Train an Instance Segmentation Model
Training an instance segmentation model with LightlyTrain is straightforward and only requires a few lines of code. See data for more details on how to prepare your dataset.
import lightly_train

if __name__ == "__main__":
    lightly_train.train_instance_segmentation(
        out="out/my_experiment",
        model="dinov3/vitl16-eomt-inst-coco",
        data={
            "format": "yolo",           # either "yolo" or "coco"
            "path": "my_data_dir",      # Path to dataset directory
            "train": "images/train",    # Path to training images
            "val": "images/val",        # Path to validation images
            "names": {                  # Classes in the dataset
                0: "background",
                1: "car",
                2: "bicycle",
                # ...
            },
            # Optional, classes that are in the dataset but should be ignored during
            # training.
            # "ignore_classes": [0],
            #
            # Optional, skip images without label files. By default, these are included
            # as negative samples.
            # "skip_if_label_file_missing": True,
        },
    )
During training, the best and last model weights are exported to
out/my_experiment/exported_models/, unless disabled in save_checkpoint_args:
best (highest validation mask mAP):
exported_best.ptlast:
exported_last.pt
You can use these weights to continue fine-tuning on another dataset by loading the
weights with model="<checkpoint path>":
import lightly_train

if __name__ == "__main__":
    lightly_train.train_instance_segmentation(
        out="out/my_experiment",
        model="out/my_experiment/exported_models/exported_best.pt",  # Continue training from the best model
        data={...},
    )
Load the Trained Model from Checkpoint and Predict
After the training completes, you can load the best model checkpoints for inference like this:
import lightly_train

model = lightly_train.load_model("out/my_experiment/exported_models/exported_best.pt")
results = model.predict("image.jpg")
results["labels"]   # Class labels, tensor of shape (num_instances,)
results["masks"]    # Binary masks, tensor of shape (num_instances, height, width).
                    # Height and width correspond to the original image size.
results["scores"]   # Confidence scores, tensor of shape (num_instances,)
Or use one of the pretrained models directly from LightlyTrain:
import lightly_train

model = lightly_train.load_model("dinov3/vitl16-eomt-inst-coco")
results = model.predict("image.jpg")
Visualize the Predictions
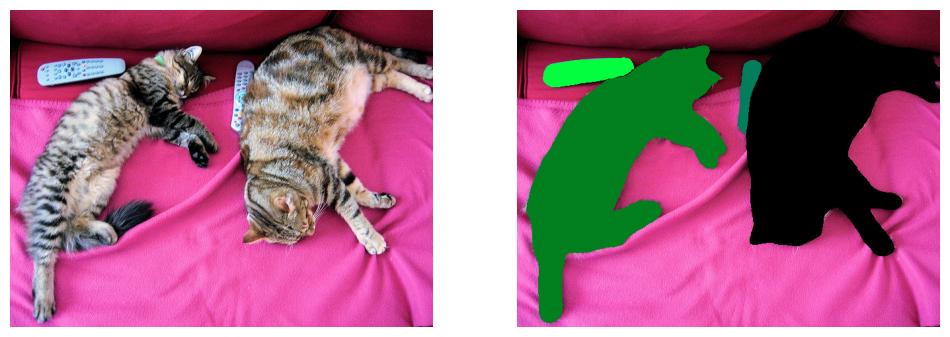
You can visualize the predicted masks like this:
import matplotlib.pyplot as plt
from torchvision.io import read_image
from torchvision.utils import draw_segmentation_masks

image = read_image("image.jpg")
image_with_masks = draw_segmentation_masks(image, results["masks"], alpha=0.6)
plt.imshow(image_with_masks.permute(1, 2, 0))
Data
LightlyTrain supports training instance segmentation models with images and polygon masks. We support inputs in either the YOLO or COCO instance segmentation formats.
We specify the training data with a data dictionary:
import lightly_train

lightly_train.train_instance_segmentation(
    ...,
    data={
        "format": ...,           # either "yolo" or "coco"
        "ignore_classes": [...], # optional list of class IDs that should be skipped during training
         # format specific options
    },
)
If you would like to skip specific classes during training, add their IDs to the
optional ignore_classes list. The trainer omits these classes from loss computation
and the exported model does not predict them.
YOLO format
For the YOLO format, every image has a corresponding label file with the .txt
extension. Each line in the label file represents one object and contains the class ID
followed by normalized polygon coordinates (x1, y1, x2, y2, ...). An example
annotation file for an image with two objects looks like this:
0 0.782016 0.986521 0.937078 0.874167 0.957297 0.782021 0.950562 0.739333
1 0.557859 0.143813 0.487078 0.0314583 0.859547 0.00897917 0.985953 0.130333 0.984266 0.184271
Your dataset directory should be organized like this:
my_data_dir/
├── images
│   ├── train
│   │   ├── image1.jpg
│   │   ├── image2.jpg
│   │   └── ...
│   └── val
│       ├── image1.jpg
│       ├── image2.jpg
│       └── ...
└── labels
    ├── train
    │   ├── image1.txt
    │   ├── image2.txt
    │   └── ...
    └── val
        ├── image1.txt
        ├── image2.txt
        └── ...
Alternatively, the splits can also be at the top level:
my_data_dir/
├── train
│   ├── images
│   │   ├── image1.jpg
│   │   ├── image2.jpg
│   │   └── ...
│   └── labels
│       ├── image1.txt
│       ├── image2.txt
│       └── ...
└── val
    ├── images
    │   ├── image1.jpg
    │   ├── image2.jpg
    │   └── ...
    └── labels
        ├── image1.txt
        ├── image2.txt
        └── ...
Each class in the dataset must be listed in the names dictionary. The keys are the
class IDs used inside the YOLO annotations and the values are the human-readable class
names. Any class IDs that appear in the label files but are not present in the
dictionary are silently ignored.
Missing Labels
There are three cases in which an image may not have any corresponding labels:
The label file is missing.
The label file is empty.
The label file only contains annotations for classes that are in
ignore_classes.
LightlyTrain treats all three cases as “negative” samples and includes the images in training with an empty list of segmentation masks.
If you would like to exclude images without label files from training, you can set the
skip_if_label_file_missing argument in the data configuration. This only excludes
images without a label file (case 1) but still includes cases 2 and 3 as negative
samples.
Example
import lightly_train

lightly_train.train_instance_segmentation(
    ...,
    data={
        "format": "yolo",
        "path": "my_data_dir",
        "train": "images/train",
        "val": "images/val",
        "names": {...},
        "skip_if_label_file_missing": True, # Skip images without label files.
    }
)
COCO format
For the COCO format, every split has a separate annotations JSON file. It specifies which images and classes belong to the split and contains the polygon masks. The structure of such a file is as follows:
{
    "images": [
        {
            "id": 1,
            "file_name": "image1.jpg",
            "width": 640,
            "height": 480
        },
        {
            "id": 2,
            "file_name": "image2.jpg",
            "width": 640,
            "height": 480
        }
    ],
    "categories": [
        {
            "id": 0,
            "name": "cat"
        },
        {
            "id": 1,
            "name": "dog"
        }
    ],
    "annotations": [
        {
            "id": 1,
            "image_id": 1,
            "category_id": 0,
            "segmentation": [[10, 20, 30, 20, 30, 40, 10, 40]],
            "bbox": [10, 20, 20, 20]
        },
        {
            "id": 2,
            "image_id": 1,
            "category_id": 1,
            "segmentation": [
                [150, 30, 200, 30, 200, 80, 150, 80],
                [210, 30, 260, 30, 260, 80, 210, 80]
            ],
            "bbox": [150, 30, 110, 50]
        },
        {
            "id": 3,
            "image_id": 2,
            "category_id": 0,
            "segmentation": [[5, 10, 90, 10, 90, 70, 5, 70]],
            "bbox": [5, 10, 85, 60]
        }
    ]
}
The file_name field can also be an absolute or relative path to an image. One can
optionally specify the images directory so that the paths are resolved relatively to
that directory. If it is omitted, the paths are resolved relatively to the annotations
file. Furthermore, the images path itself is resolved relatively to the annotations
file.
It is good practice to have the same categories for all splits but in order to guarantee consistency, we always take them from the train split.
The segmentation field contains a list of polygon coordinate lists, each being a flat
sequence of absolute pixel coordinates [x1, y1, x2, y2, ...]. Multiple polygon lists
represent disconnected parts of the same object. The optional bbox field specifies the
bounding box as [x, y, width, height] in absolute pixel coordinates; if omitted it is
derived from the polygon coordinates.
Missing Labels
There are two cases in which an image may not have any corresponding labels:
There are no polygon masks specified for an image in the annotations file.
The annotations file only contains annotations for classes that are in
ignore_classes.
LightlyTrain treats both cases as “negative” samples and includes the images in training with an empty list of segmentation masks.
If you would like to exclude images without polygon masks from training, you can set the
skip_if_annotations_missing argument in the data configuration. This only excludes
images without polygon masks (case 1) but still includes case 2 as negative samples.
Example
import lightly_train

lightly_train.train_instance_segmentation(
    ...,
    data={
        "format": "coco",
        "train": {
            "annotations": "train_labels.json",
            "images": "train_images/",
        },
        "val": {
            "annotations": "val_labels.json",
            "images": "val_images/",
        },
        "skip_if_annotations_missing": True, # Skip images without polygon masks.
    }
)
If in this particular example we specified file_name like this in the train annotation
file
{
    "id": 1,
    "file_name": "train_images/image1.jpg"
}
we could also omit images.
Image Formats
The following image formats are supported:
jpg
jpeg
png
ppm
bmp
pgm
tif
tiff
webp
Model
The model argument defines the model used for instance segmentation training. The
following models are available:
DINOv3 Models
dinov3/vitt16-eomt-inst-coco(fine-tuned on COCO)dinov3/vitt16plus-eomt-inst-coco(fine-tuned on COCO)dinov3/vits16-eomt-inst-coco(fine-tuned on COCO)dinov3/vitb16-eomt-inst-coco(fine-tuned on COCO)dinov3/vitl16-eomt-inst-coco(fine-tuned on COCO)dinov3/vitt16-eomtdinov3/vitt16-eupe-eomt- EUPE weightsdinov3/vitt16plus-eomtdinov3/vits16-eomtdinov3/vits16-eupe-eomt- EUPE weightsdinov3/vits16plus-eomtdinov3/vitb16-eomtdinov3/vitb16-eupe-eomt- EUPE weightsdinov3/vitl16-eomtdinov3/vitl16plus-eomtdinov3/vith16plus-eomtdinov3/vit7b16-eomt
Unless noted otherwise, all DINOv3 backbones are initialized from weights
pretrained by Meta.
The non-EUPE models with vitt16 and vitt16plus backbones use Lightly-pretrained
DINOv3 backbone weights instead. Models marked as EUPE use
EUPE weights. DINOv3 models are under the
DINOv3 license. EUPE
models are under the
FAIR Noncommercial Research License.
DINOv2 Models
dinov2/vits16-eomtdinov2/vitb16-eomtdinov2/vitl16-eomtdinov2/vitg16-eomt
All DINOv2 models are pretrained by Meta.
Training Settings
See Train Settings on how to configure training settings.
Logging
See Logging on how to configure logging.
Resume Training
See Resume Training on how to resume training.
Exporting a Checkpoint to ONNX
Open Neural Network Exchange (ONNX) is a standard format for representing machine learning models in a framework independent manner. In particular, it is useful for deploying our models on edge devices where PyTorch is not available.
Requirements
Exporting to ONNX requires some additional packages to be installed. Namely
onnxruntime if
verifyis set toTrue.onnxslim if
simplifyis set toTrue.
You can install them with:
pip install "lightly-train[onnx,onnxruntime,onnxslim]"
The following example shows how to export a previously trained model to ONNX.
import lightly_train

# Instantiate the model from a checkpoint.
model = lightly_train.load_model("out/my_experiment/exported_models/exported_best.pt")

# Export the PyTorch model to ONNX.
model.export_onnx(
    out="out/my_experiment/exported_models/model.onnx",
    # precision="fp16", # Export model with FP16 weights for smaller size and faster inference.
)
See export_onnx() for all available options
when exporting to ONNX.
The following notebook shows how to export a model to ONNX in Colab:
Exporting a Checkpoint to TensorRT
TensorRT engines are built from an ONNX representation of the model. The
export_tensorrt method internally exports the model to ONNX (see the ONNX export
section above) before building a TensorRT
engine for fast GPU inference.
Requirements
TensorRT is not part of LightlyTrain’s dependencies and must be installed separately. Installation depends on your OS, Python version, GPU, and NVIDIA driver/CUDA setup. See the TensorRT documentation for more details.
On CUDA 12.x systems you can often install the Python package via:
pip install tensorrt-cu12
import lightly_train

# Instantiate the model from a checkpoint.
model = lightly_train.load_model("out/my_experiment/exported_models/exported_best.pt")

# Export to TensorRT from an ONNX file.
model.export_tensorrt(
    out="out/my_experiment/exported_models/model.trt", # TensorRT engine destination.
    # precision="fp16", # Export model with FP16 weights for smaller size and faster inference.
)
See export_tensorrt() for all available
options when exporting to TensorRT.
You can also learn more about exporting EoMT to TensorRT using our Colab notebook:
Default Image Transform Arguments
The following are the default image transform arguments. See Transforms on how to customize transform settings.
EoMT Instance Segmentation DINOv3 Default Transform Arguments
Train
{
    "bbox_params": "BboxParams",
    "channel_drop": null,
    "color_jitter": null,
    "image_size": "auto",
    "normalize": "auto",
    "num_channels": "auto",
    "random_crop": {
        "fill": 0,
        "height": "auto",
        "pad_if_needed": true,
        "pad_position": "center",
        "prob": 1.0,
        "width": "auto"
    },
    "random_flip": {
        "horizontal_prob": 0.5,
        "vertical_prob": 0.0
    },
    "random_rotate": null,
    "random_rotate_90": null,
    "scale_jitter": {
        "divisible_by": null,
        "max_scale": 2.0,
        "min_scale": 0.1,
        "num_scales": 20,
        "prob": 1.0,
        "sizes": null,
        "step_stop": null
    },
    "smallest_max_size": null
}
Val
{
    "bbox_params": "BboxParams",
    "channel_drop": null,
    "color_jitter": null,
    "image_size": null,
    "normalize": "auto",
    "num_channels": "auto",
    "random_crop": null,
    "random_flip": null,
    "random_rotate": null,
    "random_rotate_90": null,
    "scale_jitter": null,
    "smallest_max_size": null
}
EoMT Instance Segmentation DINOv2 Default Transform Arguments
Train
{
    "bbox_params": "BboxParams",
    "channel_drop": null,
    "color_jitter": null,
    "image_size": "auto",
    "normalize": "auto",
    "num_channels": "auto",
    "random_crop": {
        "fill": 0,
        "height": "auto",
        "pad_if_needed": true,
        "pad_position": "center",
        "prob": 1.0,
        "width": "auto"
    },
    "random_flip": {
        "horizontal_prob": 0.5,
        "vertical_prob": 0.0
    },
    "random_rotate": null,
    "random_rotate_90": null,
    "scale_jitter": {
        "divisible_by": null,
        "max_scale": 2.0,
        "min_scale": 0.1,
        "num_scales": 20,
        "prob": 1.0,
        "sizes": null,
        "step_stop": null
    },
    "smallest_max_size": null
}
Val
{
    "bbox_params": "BboxParams",
    "channel_drop": null,
    "color_jitter": null,
    "image_size": null,
    "normalize": "auto",
    "num_channels": "auto",
    "random_crop": null,
    "random_flip": null,
    "random_rotate": null,
    "random_rotate_90": null,
    "scale_jitter": null,
    "smallest_max_size": null
}