04 Object Detection#
LightlyEdge comes with a built-in object detection model. The model is tailored
for automotive industry and provides classes like car, pedestrian, bicycle,
truck, etc. Moreover, classification can be performed for the traffic sign class
to identify the sign type. Other detection classes might be enabled for classification
in the future.
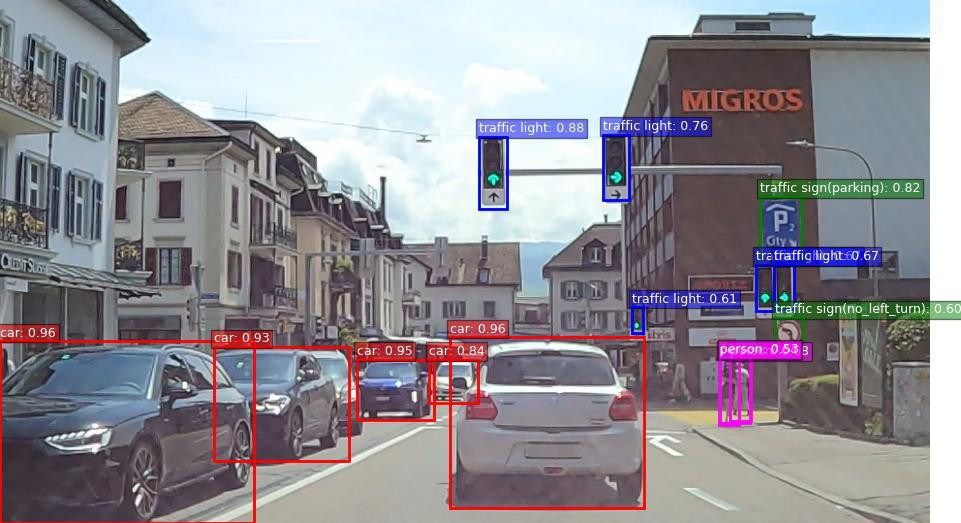
In this guide, we detect objects in the image on the left. The image on the right shows the result. We also set up a detection strategy to identify images with objects of interest.

Project Setup#
The setup is similar to the other guides.
Inside of the existing
getting_startedfolder create a new folder04_object_detection.mkdir -p getting_started/04_object_detection
Right-click and download the left image above into
04_object_detection/swiss_town.jpg
After completing this guide, the folder structure will be as follows:
getting_started
├── 02_similarity_search
│   └── ...
├── 03_diversity_selection
│   └── ...
├── 04_object_detection
│   ├── swiss_town.jpg
│   └── main.py
└── lightly_model.tar
Note
In this example we use the model version lightly_model_14.tar. You might
need to adjust the thresholds in this tutorial if your model version differs.
Run a Complete Example#
Create 04_object_detection/main.py and copy the contents below into it.
We will first run the example, and explain it right after.
from lightly_edge_sdk import LightlyEdge, LightlyEdgeConfig, LightlyEdgeDetectorConfig
from PIL import Image

# Initialize LightlyEdge with object detector enabled.
print("Initializing LightlyEdge...")
config = LightlyEdgeConfig.default()
config.detector_config = LightlyEdgeDetectorConfig(
    object_detector_enable=True,
    classifiers_enable=True,
    max_classifications=5,
)
lightly_edge = LightlyEdge(path="../lightly_model.tar", config=config)

# Embed the image and detect objects.
with Image.open("swiss_town.jpg") as frame:
    image_embedding = lightly_edge.embed_frame(frame);
    detections = lightly_edge.detect(frame=frame)

# Get class labels.
# For lightly_model_14.tar, class ID 5 is "traffic sign".
traffic_sign_class_id = 5
class_labels = lightly_edge.detection_class_labels()
traffic_sign_labels = lightly_edge.detection_subclass_labels(traffic_sign_class_id);

# Print detections.
print(f"Detected {len(detections)} objects:")
for det in detections:
    print(
        f"\"{class_labels[det.class_id]}\", "
        f"confidence={det.confidence:.2f}, "
        f"x={det.x}, y={det.y}, w={det.w}, h={det.h}",
        end=''
    )
    if det.class_id == traffic_sign_class_id and det.subclass_id is not None:
        print(f", subclass: \"{traffic_sign_labels[det.subclass_id]}\"", end='')
    print()

# Register a detection strategy.
# For lightly_model_14.tar, class ID 5 is "traffic sign" , its subclass 32 is "parking".
lightly_edge.register_detection_strategy(class_id=5, subclass_id=32, threshold=0.7);

# Check if the image should be selected.
select_info = lightly_edge.should_select(image_embedding, detections);
print(f"Should select: {select_info.detection[0].should_select}")
Run it:
# Enter the project folder.
cd 04_object_detection

# Run the Python script
python main.py
The output should be similar to the following, the values might slightly differ on your machine architecture:
Initializing LightlyEdge...
Detected 14 objects:
"car", confidence=0.96, x=464, y=348, w=201, h=176
"car", confidence=0.95, x=0, y=352, w=262, h=188
"car", confidence=0.94, x=368, y=371, w=79, h=62
"car", confidence=0.94, x=219, y=358, w=150, h=118
"traffic light", confidence=0.88, x=493, y=141, w=31, h=74
"car", confidence=0.83, x=442, y=371, w=52, h=44
"traffic sign", confidence=0.82, x=784, y=203, w=44, h=70, subclass: "parking"
"traffic light", confidence=0.76, x=622, y=139, w=27, h=66
"traffic light", confidence=0.72, x=780, y=273, w=20, h=47
"person", confidence=0.71, x=752, y=370, w=23, h=63
"traffic light", confidence=0.64, x=798, y=273, w=21, h=46
"person", confidence=0.61, x=742, y=369, w=19, h=68
"traffic light", confidence=0.61, x=652, y=318, w=11, h=26
"traffic sign", confidence=0.58, x=799, y=328, w=29, h=32, subclass: "no_left_turn"
Should select: True
Object Detection#
By default, object detection and object classification models are not loaded. To enable them, we pass LightlyEdgeConfig when creating a LightlyEdge instance. We enable object detection and classification by:
config = LightlyEdgeConfig.default()
config.detector_config = LightlyEdgeDetectorConfig(
    object_detector_enable=True,
    classifiers_enable=True,
    max_classifications=5,
)
lightly_edge = LightlyEdge(path="../lightly_model.tar", config=config)
Warning
Currently it is not possible to set configuration values by chaining the dot notation,
e.g. by config.detector_config.object_detector_enable = True because of the way
structures are exposed from Rust. Please set the whole config.detector_config structure
instead.
Detection is performed with LightlyEdge.detect.
Moreover, if classifiers_enable was set to true, classification is performed for each
class for which a classifier exists (currently only traffic_sign). To bound the compute
time, only 5 most confident detections are classified for each class. This value can be
customised by setting config.detector_config.max_classifications.
The code below both embeds the image and performs detections. We embed the image for a later use with LightlyEdge.should_select.
with Image.open("swiss_town.jpg") as frame:
    image_embedding = lightly_edge.embed_frame(frame);
    detections = lightly_edge.detect(frame=frame)
Next we print the detections. First we fetch the list of class labels with LightlyEdge.detection_class_labels and LightlyEdge.detection_subclass_labels. The models return zero-based class IDs, these lists provide the mapping from ID to a human readable label.
# For lightly_model_14.tar, class ID 5 is "traffic sign".
traffic_sign_class_id = 5
class_labels = lightly_edge.detection_class_labels()
traffic_sign_labels = lightly_edge.detection_subclass_labels(traffic_sign_class_id);
Result of detection is a list of ObjectDetection structures. The printing code showcases its members:
class_idis the ID of the detected class.confidenceis a float value between 0 and 1. All detections have confidence value at least 0.5.Bounding box in pixel coordinates. Values
xandyidentify the top left corner,wits width andhits height.subclass_idis the subclass ID determined by a classifier. If a classification was not performed for this detection the value is set toNone.
When overlaid over the original image, the detections look like this:
Detection Strategy#
Additionally, a detection strategy can be registered with LightlyEdge. The arguments
of the LightlyEdge.register_detection_strategy
function are class ID, subclass ID, and confidence threshold. A frame is considered
matching the strategy if it contains a detection where the class ID and subclass ID
match and the detection confidence is higher than the threshold. When registering the
strategy, default value None can be used for subclass ID to have it ignored.
# For lightly_model_14.tar, class ID 5 is "traffic sign" , its subclass 32 is "parking".
lightly_edge.register_detection_strategy(class_id=5, subclass_id=32, threshold=0.7);
Finally, we check whether the frame matches the strategy by calling
LightlyEdge.should_select.
Note that the image_embedding parameter is irrelevant in this setup.
select_info = lightly_edge.should_select(image_embedding, detections);
print(f"Should select: {select_info.detection[0].should_select}")
Because the example image contains a traffic sign of type “parking” the value of
select_info.detection[0].should_select will be true.
Next Steps#
Congratulations, you have completed the main part of the Getting Started guide. In the next optional section you can learn how to use LightlyEdge with OpenCV.