Curate a Traffic CCTV Dataset for YOLO Training
In this tutorial, you learn how to turn a folder of raw, unlabeled images into a curated, annotated dataset ready for YOLO object detection training. All using LightlyStudio's GUI and a few short Python scripts.
We use the justjuu/traffic-accident-cctv-object-detection dataset from Hugging Face, but treat it as an unannotated folder of CCTV images, ignoring its existing labels. This lets us follow a realistic workflow that starts from raw, unlabeled data.
You will:
- Explore the dataset with the embedding plot and tag outliers.
- Filter and deduplicate the dataset to remove irrelevant and near-duplicate images.
- Auto-label the images with a YOLO inference plugin, then review and correct the generated annotations.
- Split the curated dataset into training and test sets and export it in YOLO format.
- Train and evaluate a YOLO model on the exported dataset.
Prerequisites
To follow this tutorial, make sure you have:
- Python 3.10 or newer
- Enough disk space for LightlyStudio, the YOLO plugin and the dataset (~200MB)
- You run on a Windows, Linux or MacOS device
- A GPU is not required
Installation
Install LightlyStudio
To install LightlyStudio you can run the following Python pip command:
pip install lightly-studio
Install the YOLO inference plugin
There are two ways to bring model predictions into LightlyStudio for pre-labeling or auto-labeling.
- Add YOLO predictions directly in the Python script used to load the dataset.
- Use a plugin to run the model directly from the LightlyStudio GUI.
In this tutorial, we use the YOLO inference plugin.
Run:
pip install "git+https://github.com/lightly-ai/lightly-studio-plugins.git#subdirectory=plugins/yolo_object_detection/"
Tip
You need to install the plugin before running the GUI. If LightlyStudio is already running, stop the server, install the plugin, and then restart the server.
Load the dataset
Create a Python script and define the path to your local image folder. Then, create a LightlyStudio dataset and load the images.
The load_dataset.py script below indexes the images and computes embeddings. This enables the embedding plot and semantic search in the LightlyStudio UI.
import lightly_studio as ls
from lightly_plugins_yolo_object_detection.operator import YoloObjectDetectionOperator

# This is only needed if you want to download and use the example dataset
dataset_path = ls.utils.download_example_dataset(download_dir="dataset_examples")

dataset = ls.ImageDataset.create(name="cctv")

# Make sure the path is pointing to the correct folder
dataset.add_images_from_path(
    path=f"{dataset_path}/traffic-accident-cctv/train"
)

# This will start the GUI and block the script from exiting
ls.start_gui()
Run the script from your terminal:
python load_dataset.py
After the script starts, LightlyStudio prints the local URL where the GUI is available. You should see output similar to this:
INFO: Found 128 images in /path/to/your/image/folder.
INFO: Open the LightlyStudio GUI under: http://localhost:8001
INFO: Discovered plugin 'yolo_object_detection'
INFO: Operator 'YOLO Object Detection' started.
INFO: Uvicorn running on http://localhost:8001
INFO: Using MobileCLIP embedding generator for images.
Open the displayed URL (http://localhost:8001) in your browser to start exploring the dataset in LightlyStudio.
Explore the dataset
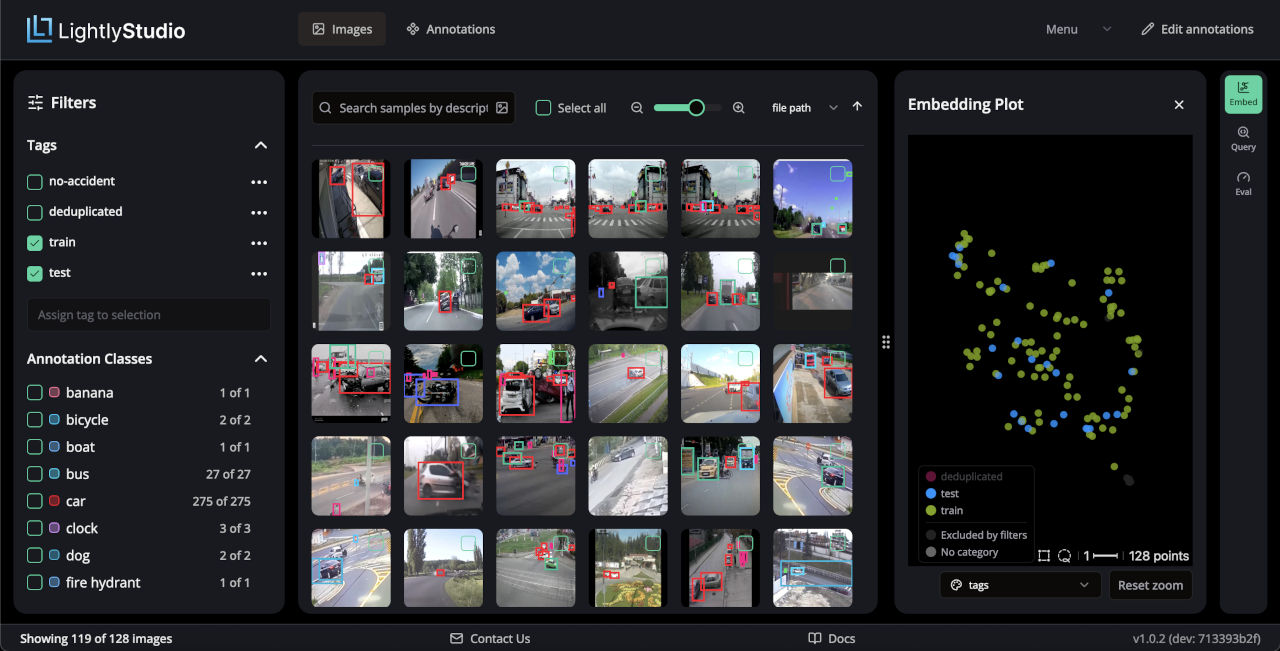
Open the dataset in LightlyStudio and inspect the embedding plot by clicking on the Embed button on the upper right side of the GUI.
The embedding plot groups visually similar images close to each other. Use it to understand the dataset structure and identify samples that are useful for training, such as images containing vehicles, traffic scenes, accidents, or other relevant objects.
While exploring the dataset, you may notice that only a few samples are clear outliers. These outliers can include images without vehicles, blurry images, or samples that are not relevant to the task.
Let's tag these outliers so we can easily exclude them or review them later. For that, click on the lasso tool at the bottom of the embedding plot. Once selected you can draw a lasso around the embedding points of interest.
Next, select promising clusters in the embedding plot and inspect the corresponding images. When you find samples that are suitable for training, tag them so they can be exported or reviewed later as part of your training subset.
Tip
The bottom left of the GUI shows how many images are currently displayed based on the active filters and tags. Use it to keep track of how many samples remain in your selection as you tag and filter the dataset.
Filter out outliers and deduplicate the dataset
After tagging outliers in the embedding plot, use the Query Filter together with deduplication sampling to narrow the dataset down to a clean, non-redundant set of training candidates.
First, open the query editor on the right side of LightlyStudio and enter a query that excludes the outlier tag you created in the previous step. For example:
NOT "no-accident" IN tags
Update the tag name in the query to match the tag you used to mark outliers. Click Apply to filter the dataset down to the active view.
Next, open Menu > Sampling and run deduplication sampling on the active view. Deduplication sampling looks at the embedding distance between the filtered images and removes near-duplicates, so the resulting set does not contain many highly similar images.
Configure the sampling step to reduce the active view down to a smaller, diverse subset, for example 20 images out of the filtered set. Select the resulting samples and create a new tag for them, such as deduplicated.
You can use these samples later to create your training and test sets.
Using the YOLO plugin
Once you have finished curating the dataset, select the images you want to process or apply filters to define the active view. The plugin runs on the selected samples or on the images in the active view, depending on how it is launched.
- Open the menu on the top right and click Plugins.
- Click YOLO Object Detection.
- Pick a model, set the confidence threshold, and optionally name the annotation source, for example
yolov8-prediction. - Click Execute to run the plugin.
Running predictions on around 120 images takes about 20 seconds on an Apple MacBook. Once it finishes, the predictions appear in the GUI.
Review and correct annotations
Not every prediction is accurate, especially for small objects, low image quality, or difficult scenes. There are two ways to review and fix annotations in LightlyStudio:
- Tag images with bad annotations in the grid view. Scroll through the grid, select images with faulty annotations, and tag them for later review. Adjust the grid's preview size to control how many images you see at once. This approach is recommended if a separate labeling team will correct the flagged annotations.
- Edit annotations directly in the annotation view. For object detection, switch to the annotation view, which shows each annotation as a cropped-out image. This makes it easy to skim through many objects at once. Combine it with the class filter in the left panel to look at one class at a time — a grid of objects from a single class makes outliers, such as wrong classes or bad bounding boxes, much easier to spot. This approach is recommended if you are doing the QA yourself. See Find Wrong Annotations for two further ways to find wrong annotations.
Split the dataset into training and test sets
LightlyStudio provides smart sampling tools that can help you create a diverse training set.
First, use the left filter panel to select the deduplicated samples you tagged in the previous step. Then open the sampling dialog again and choose diversity sampling.
Configure the sampling step to select 80% of the deduplicated samples and assign them a new tag, such as train.
After creating the training split, use the Query Filter to select the remaining deduplicated samples that were not tagged as training samples. For example:
"deduplicated" IN tags AND NOT "train" IN tags
Update the tag names in the query to match the tags you created in your project. Click Apply, then click Select all to select all visible samples, and create a new tag, such as test.
Export in YOLO format
To train and evaluate the YOLO model, export the curated train and test splits from LightlyStudio.
LightlyStudio supports exporting annotations through the GUI or the Python API. In this example, we use the Python export API to export the samples tagged as train and test.
import lightly_studio as ls
from lightly_studio.core.dataset_query.image_sample_field import ImageSampleField

dataset = ls.ImageDataset.load(name="cctv")

# Tags to export
tags_to_export = ["train", "test"]

for tag in tags_to_export:
    query = dataset.query().match(ImageSampleField.tags.contains(tag))
    dataset.export(query).to_yolo_object_detections(f"{tag}_yolo/")
    print(f"Exported samples with tag '{tag}' to {tag}_yolo/")
After executing this script, you should see a similar output:
Exported samples with tag 'train' to train_yolo/
Exported samples with tag 'test' to test_yolo/
You can use these exported directories to train and evaluate your YOLO object detection model.
Train and evaluate the YOLO model
After exporting the dataset, run a short YOLO training and evaluation job to verify that the exported files can be used by a training pipeline.
The train_yolo directory contains the samples used for training, and the test_yolo directory contains the samples used for evaluation.
First, install Ultralytics if it is not already installed:
pip install ultralytics
Then create a Python script, for example train_yolo.py.
In this example, the images are stored in the original dataset folder, while the YOLO labels are split into train_yolo and test_yolo. The script copies the corresponding images into each split, builds a combined data.yaml file, trains a YOLO model, and evaluates it on the test split.
import shutil
from pathlib import Path
from ultralytics import YOLO
import yaml
import lightly_studio as ls

dataset_path = ls.utils.download_example_dataset(download_dir="dataset_examples")

images_dir = Path(f"{dataset_path}/traffic-accident-cctv/train/")
train_yolo_dir = Path("train_yolo")
test_yolo_dir = Path("test_yolo")

def find_image(stem):
    candidate = images_dir / f"{stem}.jpg"
    if candidate.exists():
        return candidate
    return None

def copy_images_for_split(split_dir: Path):
    labels_dir = split_dir / "labels"
    images_out = split_dir / "images"
    images_out.mkdir(exist_ok=True)

    count = 0
    for label_file in labels_dir.glob("*.txt"):
        image_file = find_image(label_file.stem)
        if image_file is None:
            print(f"  [!] No image found for {label_file.name}, skipping")
            continue
        shutil.copy2(image_file, images_out / image_file.name)
        count += 1

    print(f"{split_dir}: copied {count} images")

print("Copying images into each split...")
copy_images_for_split(train_yolo_dir)
copy_images_for_split(test_yolo_dir)

with open(train_yolo_dir / "data.yaml") as f:
    existing_config = yaml.safe_load(f)

class_names = existing_config["names"]
num_classes = existing_config["nc"]

combined_config = {
    "train": str(train_yolo_dir / "images"),
    "val": str(test_yolo_dir / "images"),
    "nc": num_classes,
    "names": class_names,
}

data_yaml_path = Path("data.yaml")
with open(data_yaml_path, "w") as f:
    yaml.dump(combined_config, f)

print(f"\nWrote {data_yaml_path}")

model = YOLO("yolov8n.pt")

model.train(
    data=str(data_yaml_path),
    epochs=5,
    imgsz=640,
)

metrics = model.val(data=str(data_yaml_path), split="val")
print("Evaluation metrics:", metrics.results_dict)
Run the script with:
python train_yolo.py
After training, Ultralytics evaluates the model on the test_yolo split and prints the evaluation metrics. You should see output similar to this:
Validating runs/detect/train/weights/best.pt...

Model summary (fused): 73 layers, 3,151,904 parameters, 8.7 GFLOPs

                 Class     Images  Instances      Box(P)      R      mAP50  mAP50-95
                   all         18        127      0.025   0.0185    0.00504   0.00307
              backpack          1          1          0        0          0         0
               bicycle          1          2          0        0          0         0
                   bus          2          2          0        0          0         0
                   car         18         81       0.25    0.185     0.0504    0.0307
               giraffe          1          2          0        0          0         0
            motorcycle          2          5          0        0          0         0
                person          5          9          0        0          0         0
             stop sign          2          2          0        0          0         0
         traffic light          2          4          0        0          0         0
                 truck         11         19          0        0          0         0

Speed: 0.6ms preprocess, 121.6ms inference, 0.0ms loss, 1.0ms postprocess per image

Results saved to runs/detect/train
Results saved to runs/detect/val

Evaluation metrics: {
  'metrics/precision(B)': 0.025,
  'metrics/recall(B)': 0.0185,
  'metrics/mAP50(B)': 0.0050,
  'metrics/mAP50-95(B)': 0.0031,
  'fitness': 0.0031
}
The exact values will depend on the dataset size, selected classes, annotation quality, model size, and number of training epochs. In this tutorial, the goal is not to train a highly accurate model, but to verify that the exported YOLO dataset can be used successfully for training and evaluation.
Conclusion
In this tutorial, we prepared a YOLO object detection dataset from raw traffic CCTV images using LightlyStudio.
We started by loading the images into LightlyStudio and using the embedding plot to explore the dataset. Then, we tagged outliers, used the Query Filter together with deduplication sampling to remove near-duplicate samples, and ran the YOLO inference plugin to generate initial annotations. Finally, we reviewed and corrected the generated annotations to improve their quality.
Next, we split the curated samples into training and test sets, exported both splits in YOLO format, and ran a short Ultralytics training and evaluation job to verify that the exported dataset could be used by a standard YOLO training pipeline.
This workflow provides a practical way to go from a folder of raw images to a curated, annotated, and trainable YOLO dataset. From here, you can continue improving the dataset by reviewing more annotations, adding more diverse samples, adjusting the train/test split, or running a longer YOLO training job.
