Evaluate YOLO26 on your dataset with LightlyStudio
In this tutorial, you learn how to evaluate a YOLO26 model against ground-truth labels, find failure patterns, spot bad labels, and fix or export the samples that need attention.
You will:
- Load images and ground-truth labels in YOLO or COCO format.
- Run YOLO26 predictions with Python or the LightlyStudio plugin.
- Evaluate predictions against ground truth.
- Use metrics, the confusion matrix, and embeddings to find problems.
- Tag issues and export data for your annotation vendor.
How model evaluation works
Model evaluation in LightlyStudio follows four steps:
- Index your ground-truth annotations: load images and their
ground_truthlabels into a LightlyStudio dataset. - Index your model's predictions: run your model on the same images and save the output boxes as a separate annotation layer.
- Create an evaluation run: match predictions against ground truth by IoU and class, and compute per-sample and per-class metrics.
- Inspect the results: use the metrics, confusion matrix, and embeddings to tell wrong annotations apart from real model failures, then fix or export what needs attention.
This tutorial walks through these steps in order, using a single Python script, evaluate_yolo26.py, that you extend section by section. The script is only complete once you reach Step 3: Run model evaluation. You can also run the script earlier if you want to check progress in the GUI along the way.
New to terms like ground truth, IoU, or TP/FP/FN? A quick glossary
| Term | Meaning |
|---|---|
| Ground truth | The correct, human-verified annotations you evaluate predictions against |
| Annotation source | A named group of annotations on the same images, for example ground_truth or yolo26n.pt_prediction |
| Prediction | The boxes your model outputs, stored as their own annotation source |
| IoU | Intersection over union: how much a predicted box overlaps its matching ground-truth box |
| TP / FP / FN | True positive (correct detection), false positive (wrong or extra prediction), false negative (missed object) |
| Confusion matrix | A table showing which ground-truth classes get predicted as which classes |
See Model Evaluation for the full explanation of matching and metrics.
Prerequisites
To follow this tutorial, make sure you have:
- Python 3.10 or newer
Installation
pip install lightly-studio ultralytics
Step 1: Load the dataset in LightlyStudio
Create a Python script, for example evaluate_yolo26.py, and add the snippet below. Run it to load the example COCO dataset and its ground-truth labels.
import lightly_studio as ls

dataset_path = ls.utils.download_example_dataset(download_dir="dataset_examples")

IMAGE_PATH = f"{dataset_path}/coco_subset_128_images/images"
COCO_JSON = f"{dataset_path}/coco_subset_128_images/instances_train2017.json"

# Resets the local database so the tutorial always starts from a clean project.
# Remove this if you want to keep data from previous runs.
ls.db_manager.connect(cleanup_existing=True)
dataset = ls.ImageDataset.create()

dataset.add_images_from_path(path=IMAGE_PATH)
dataset.add_annotations_from_coco(
    annotations_json=COCO_JSON,
    images_root=IMAGE_PATH,
    annotation_source="ground_truth",
)
If you want to follow along with your own dataset instead, see Load an Image Dataset for loading YOLO, COCO, and other formats, or the Quickstart for a minimal example.
Running the script now is optional: you'll keep extending evaluate_yolo26.py in the sections below, and it's only complete once you reach Step 3: Run model evaluation.
Tip
Want to check the data now anyway? Run python evaluate_yolo26.py, then lightly-studio gui from a separate terminal to open the GUI without re-running the script.
Expected result: 128 images loaded with a ground_truth annotation layer.
Step 2: Run YOLO26 predictions
Ultralytics returns detections in its own box format (center x, center y, width, height). LightlyStudio stores annotations as CreateObjectDetection objects with a top-left corner, class name, and confidence.
Add the snippet below to the end of evaluate_yolo26.py: it converts boxes to that format, runs the model on every image, and saves the predictions as a separate annotation layer.
from ultralytics import YOLO
from lightly_studio.core.annotation import CreateObjectDetection


def yolo_box_to_annotation(box, class_names):
    """Convert a YOLO26 box to a LightlyStudio object-detection annotation."""
    cls_id = int(box.cls)
    x, y, w, h = box.xywh[0].tolist()

    return CreateObjectDetection(
        class_name=class_names[cls_id],
        x=round(x - w / 2),
        y=round(y - h / 2),
        width=max(1, round(w)),
        height=max(1, round(h)),
        confidence=float(box.conf),
    )


def predict_using_yolo26(
    dataset: ls.ImageDataset,
    model_name: str = "yolo26n.pt",
    conf: float = 0.25,
    annotation_source: str | None = None,
) -> int:
    model = YOLO(model_name)
    if annotation_source is None:
        annotation_source = f"{model_name}_prediction"
    total_annotations = 0

    for sample in dataset:
        result = model.predict(
            source=sample.file_path_abs,
            conf=conf,
            verbose=False
        )[0]
        annotations = [
            yolo_box_to_annotation(box, result.names)
            for box in (result.boxes or [])
        ]
        if annotations:
            sample.add_annotations(
                annotations=annotations,
                annotation_source=annotation_source,
            )
            total_annotations += len(annotations)
    return total_annotations


# Loads the checkpoint (downloading yolo26n.pt on first use), runs inference on
# every sample above the confidence threshold, and saves the boxes under a
# named annotation source, kept separate from `ground_truth`.
PRED_ANNOTATION_SOURCE = "yolo26n.pt_prediction"
predict_using_yolo26(dataset, annotation_source=PRED_ANNOTATION_SOURCE)
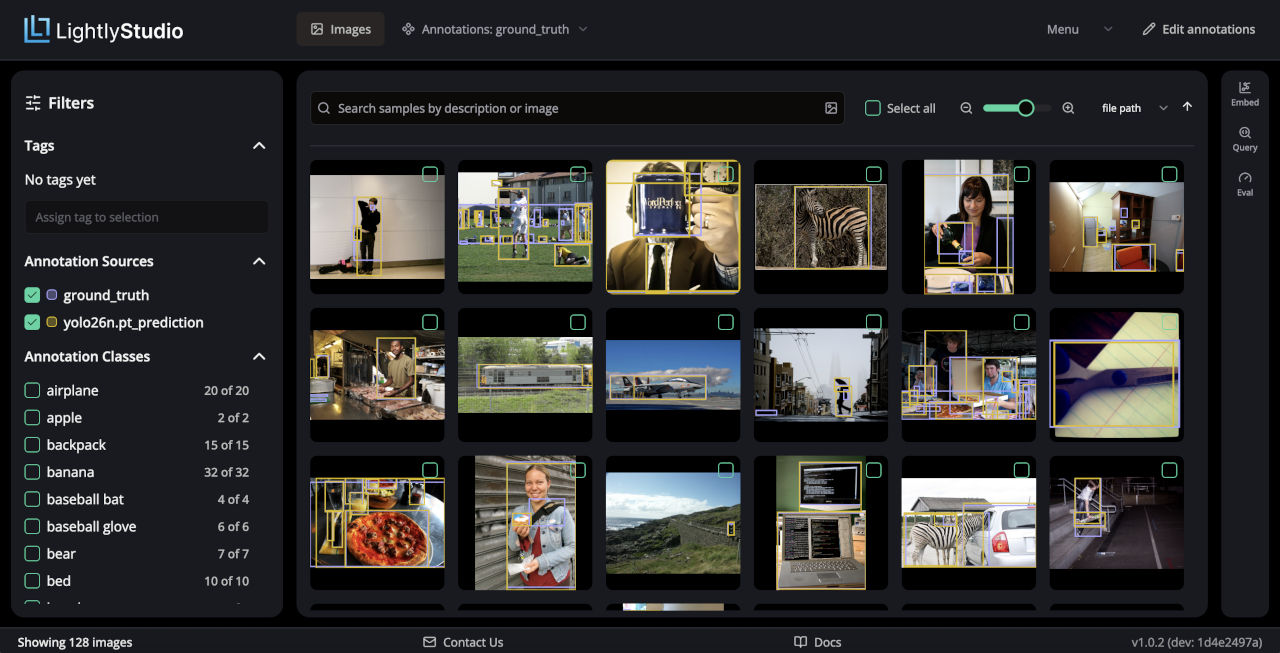
Running the script again at this point is optional too: the script is still not complete until Step 3: Run model evaluation. If you want to check the predictions now, run python evaluate_yolo26.py, then lightly-studio gui to see the yolo26n.pt_prediction layer.
Tip
You can also generate predictions from the Studio GUI with the YOLO inference plugin instead of Python. See Using the YOLO plugin in the first tutorial for setup and usage.
Step 3: Run model evaluation
Only images that have both ground truth and predictions are evaluated. See Model Evaluation for how matching and metrics are computed.
| Config | When to use |
|---|---|
classwise=True |
Standard per-class matching (default) |
classwise=False |
Also count class-confusion pairs |
iou_threshold |
0.5 for typical object detection |
Add this to the end of evaluate_yolo26.py to create an evaluation run that compares your predictions against the ground truth:
from lightly_studio.evaluation.image_dataset_evaluate import ObjectDetectionEvaluationConfig

dataset.evaluate().object_detection(
    name="gt_yolo26n",
    gt_annotation_source="ground_truth",
    pred_annotation_source=PRED_ANNOTATION_SOURCE,  # match your prediction source name
    config=ObjectDetectionEvaluationConfig(
        iou_threshold=0.5,
        classwise=True,
    ),
)
evaluate_yolo26.py is now complete. First, run the script — it loads the images, runs predictions, and creates the evaluation run:
python evaluate_yolo26.py
You should see output similar to this:
INFO: Using MobileCLIP embedding generator for images.
Generating embeddings: 100%|██████████| 128/128 [00:01<00:00, 68.15 images/s]
Embedding annotations: 100%|██████████| 900/900 [00:06<00:00, 148.00 crops/s]
Then, open the GUI to explore the results:
lightly-studio gui
You should see output similar to this:
INFO: Open the LightlyStudio GUI under: http://localhost:8001
INFO:     Uvicorn running on http://localhost:8001 (Press CTRL+C to quit)
Checkpoint
At this point your script covers the full workflow: load images and labels, run YOLO26 predictions, evaluate against ground truth, and open Studio to explore the results.
You can also create an evaluation run directly in the GUI, without writing any code:
- Open the Evaluation panel.
- Click Create run and pick the ground-truth source, prediction source, and IoU threshold.
- Name the run, for example
gt_yolo26n, and start it.
Step 4: Read the metrics
Each evaluated image gets three per-sample metrics:
| Metric | Meaning |
|---|---|
tp |
True positives — correct detections |
fp |
False positives — the model predicted something that isn't there, or matched incorrectly |
fn |
False negatives — missed ground-truth objects |
The video below shows how to create an evaluation run from the GUI, then walks through the resulting metrics, including the confusion matrix.
Confusion matrix
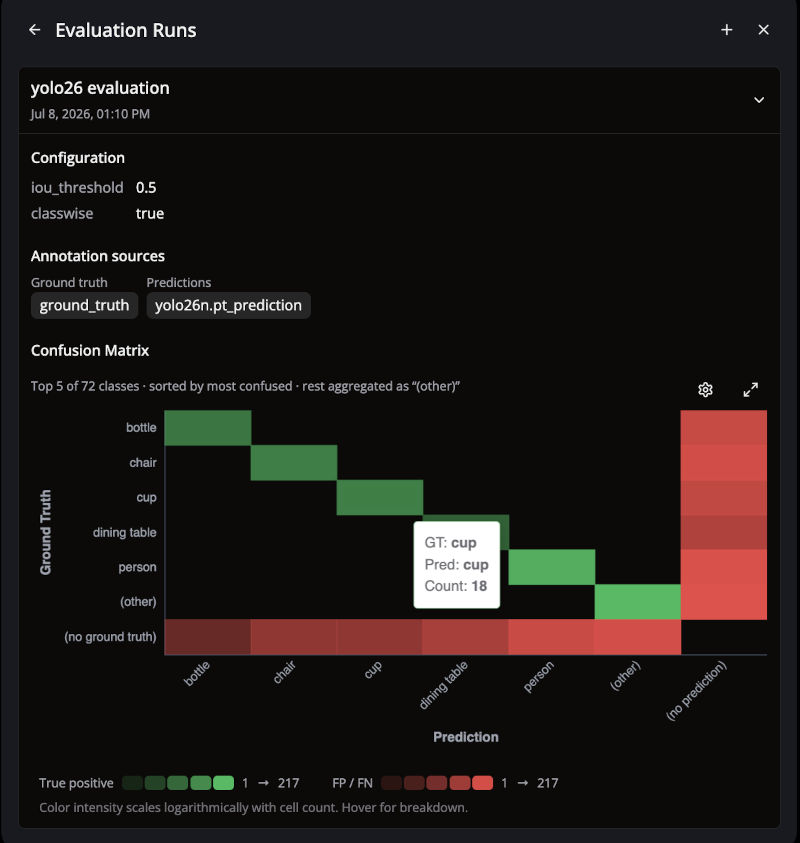
Open the confusion matrix for your evaluation run in the Evaluation panel.
- Rows are the ground-truth class; the last row,
(no ground truth), holds pure false positives. - Columns are the predicted class; the last column,
(no prediction), holds pure false negatives. - Hot cells off the diagonal point to systematic class confusion, for example
dogpredicted ascat. - A high
(no prediction)column for a class means the model misses that class. - A high
(no ground truth)row means the model hallucinates that class, or its localization is off.
See Model Evaluation for more on reading the confusion matrix.
Sort and filter by failures
In the image grid, sort by fp or fn for your evaluation run, descending, to surface the worst images first.
In the embedding plot, you can then group failures by visual similarity:
- Select the worst images from the sorted grid and tag them, for example
false positives. - Open the embedding plot and color points by tag.
- Look for clusters — groups of visually similar images that share the same failure mode, such as small objects, night scenes, or class confusion.
Fix issues in Studio
Not every high fp or fn means the model failed. Triage each case before you act on it:
| Signal | Likely cause | Action |
|---|---|---|
High fp/fn, and the ground-truth box looks wrong |
Mislabeled, missing, or shifted annotation | Fix the box in the ground_truth layer, or tag wrong_annotations to fix later |
High fp/fn, and the ground-truth box looks correct |
Real model gap: confused classes, hard scenes, objects the model never learned | Tag by pattern (for example failure_small_objects) and group with embedding clusters |
High fn on a small, isolated cluster |
Not enough data to tell a real gap from noise | Add and label more images like that cluster, then re-evaluate |
Re-run evaluation after fixing ground-truth annotations, so metrics reflect model performance rather than annotation noise — retraining on bad labels will not improve results.
Export for an annotation vendor
If you have many wrong_annotations images, export them for your labeling team.
- Filter or sort to the problematic samples.
- Select them in the grid and add the tag
wrong_annotations. - Export the ground-truth annotations: open the export dialog, choose the Image Object Detection export type, select the
ground_truthannotation source, and download. - Export the image file list: open the export dialog, choose the Image Filenames export type, select the
wrong_annotationstag, and download.
Ship the exported JSON and image paths (or copied images) to the vendor, with instructions to correct the ground_truth boxes.
Going further
Tag failures from Python
You can also tag samples with high false positives or false negatives from a script:
from lightly_studio.core.dataset_query import EvaluationMetricField, SampleEvaluationQuery

# tag images with one or more false positives with tag fp_gt_yolo26n
dataset.query().match(
    SampleEvaluationQuery("gt_yolo26n", EvaluationMetricField("fp") > 0)
).add_tag("fp_gt_yolo26n")

# tag images with two or more false negatives with tag fn_gt_yolo26n
dataset.query().match(
    SampleEvaluationQuery("gt_yolo26n", EvaluationMetricField("fn") >= 2)
).add_tag("fn_gt_yolo26n")
Compare checkpoints
To compare two models, run predictions and evaluation for each, then compare the confusion matrices and per-class fp/fn in Studio:
predict_using_yolo26(dataset, model_name="yolo26n.pt", annotation_source="yolo26n.pt_prediction")
predict_using_yolo26(dataset, model_name="yolo26s.pt", annotation_source="yolo26s.pt_prediction")

# metrics for yolo26 nano
dataset.evaluate().object_detection(
    name="gt_yolo26n",
    gt_annotation_source="ground_truth",
    pred_annotation_source="yolo26n.pt_prediction",
    config=ObjectDetectionEvaluationConfig(iou_threshold=0.5, classwise=True),
)

# metrics for yolo26 small
dataset.evaluate().object_detection(
    name="gt_yolo26s",
    gt_annotation_source="ground_truth",
    pred_annotation_source="yolo26s.pt_prediction",
    config=ObjectDetectionEvaluationConfig(iou_threshold=0.5, classwise=True),
)
Conclusion
In this tutorial, we evaluated a YOLO26 model against ground-truth labels in LightlyStudio, using an example COCO dataset.
We loaded images and ground-truth annotations, ran YOLO26 predictions with the Python API, and created an evaluation run to compare the two annotation layers. We then used per-sample metrics, the confusion matrix, and the embedding plot to separate wrong ground-truth annotations from real model failures and data gaps.
Finally, we tagged the samples that need attention and exported them for an annotation vendor to fix.
This workflow provides a practical way to go from a trained model and a labeled dataset to a prioritized list of concrete next steps: label fixes, targeted retraining, or additional data collection.
