Active Learning for Sports Applications using Keypoint Detections
Learn how to use active learning with keypoint detections directly on sports videos to extract only the most relevant frames for labeling and re-training your model.
This tutorial will teach you how to create an active learning pipeline for keypoint detection models in sports applications. You will work with a dataset of volleyball videos from different phases of a game and use LightlyOne to select 100 video frames for labeling. The frames should be distributed across the videos if possible and focus on frames with many difficult keypoint detections that will most likely improve the keypoint detection model during training.
Active Learning using Keypoint Detections
LightlyOne allows you to use keypoint detections as additional input for the selection. The keypoints serve two purposes. They can be used for active learning, taking the model confidence for the predicted keypoints into account. And they can be used to focus the selection on individual objects instead of the full images. This is especially helpful for sports applications where the people in the images might be quite far apart from each other and large parts of the image are background without much interesting information.
You will learn the following in this tutorial:
- Creating keypoint predictions directly on videos and converting the predictions into the Lightly format.
- Combining different selection strategies to select images with low-confidence keypoint predictions while maintaining a high image diversity.
- Working with metadata to ensure we balance the selected data across the videos.
Prerequisites
To upload predictions to a Lightly datasource, you will need the following things:
- Have LightlyOne installed and setup.
- Access to a cloud bucket to which you can upload your dataset. The following tutorial will use an AWS S3 bucket.
- A dataset with sports videos. We use Volleyball videos from pexels.com for the tutorial.
- The Torchvision Keypoint RCNN model to detect the keypoints.
- We recommend using
Python 3.7or newer.
Download the Dataset
Let's create a directory for our dataset:
mkdir dataThen head over to pexels.com and download the following videos into the data directory:
- https://www.pexels.com/video/people-playing-volleyball-indoors-6217178/
- https://www.pexels.com/video/people-playing-volleyball-6216952/
- https://www.pexels.com/video/people-playing-volleyball-in-gymnasium-6217182/
- https://www.pexels.com/video/people-playing-volleyball-6216955/
- https://www.pexels.com/video/athletes-playing-volleyball-6217183/
Any resolution should work, we'll use 960x540 for this tutorial.
Next, we inspect one of the videos to get an idea of what we're dealing with. We can extract frames using a tool like FFmpeg:
ffmpeg -i data/pexels-pavel-danilyuk-6216952.mp4 -ss 0 -vframes 1 first_frame.jpgAfter running the command, you should have a new file in your current working directory called first_frame.jpg. If you open the image in an image viewer you should see something similar to the image below:
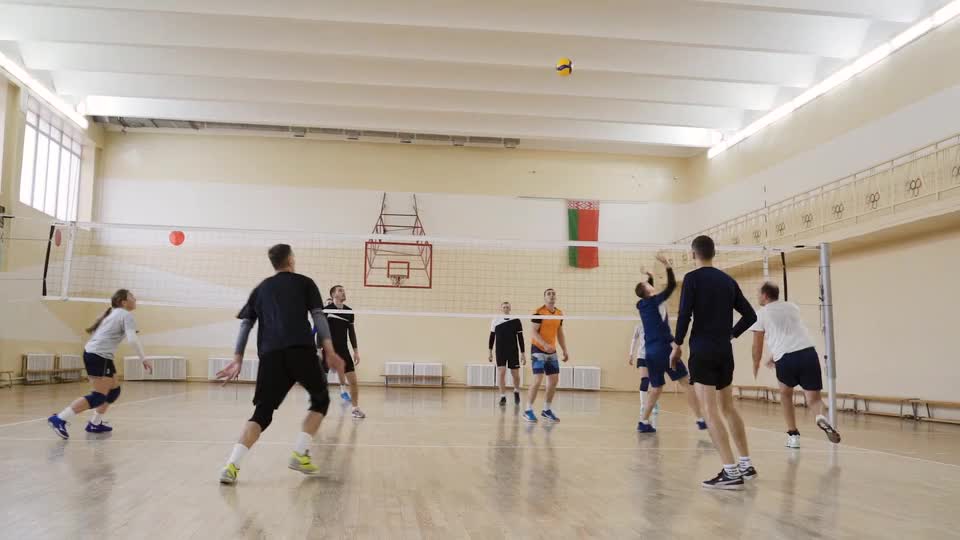
Image showing the first frame of pexels-pavel-danilyuk-6216952.mp4 obtained using the FFmpeg command above.
Get Keypoint Predictions Using Keypoint RCNN
We will use the Torchvision Keypoint RCNN model to create keypoint predictions for all athletes in the videos. To load the model, we first have to install the required libraries. We also take this opportunity to install PyAV for loading the videos and the Lightly Python Client to communicate with the LightlyOne API.
pip install torch torchvision av lightlyWe tested this tutorial using a
Python 3.10environment and the following package versions:pytorch==1.13.1 torchvision==0.14.1 av==10.0.0 lightly==1.3.1
Now we are ready to create keypoint predictions for our videos. Let's extract the first frame of a video using Python and predict keypoints with the Keypoint RCNN model.
import av
import torch
from torchvision.models.detection import (
    keypointrcnn_resnet50_fpn,
    KeypointRCNN_ResNet50_FPN_Weights,
)
import torchvision.transforms.functional as F

# load model
model = keypointrcnn_resnet50_fpn(weights=KeypointRCNN_ResNet50_FPN_Weights.COCO_V1)
model.eval()
device = "cuda" if torch.cuda.is_available() else "cpu"
model.to(device)

# load first frame using PyAV
with av.open("data/pexels-pavel-danilyuk-6216952.mp4") as container:
    stream = container.streams.video[0]
    for frame in container.decode(stream):
        image = frame.to_image()
        break

# detect keypoints
model(F.to_tensor(image).unsqueeze(0).to(device))
The model output should look like this:
[{'boxes':
    tensor([
      [ 45.8952, 287.3958, 152.5382, 438.1357],
      [212.7242, 241.4851, 340.6567, 485.9953],
      ...
    ])
  'labels': tensor([1, 1, ...]),
  'scores': tensor([0.9999, 0.9998, ...]),
  'keypoints':
    tensor([
      [[135.0029, 299.9575,   1.0000],
       [132.8558, 296.3684,   1.0000],
       ...
      ],
      [[296.4553, 263.4191,   1.0000],
       [295.0179, 259.1042,   1.0000],
       ...
      ],
    ]),
  'keypoints_scores':
    tensor([
      [11.4404,  8.5939, ...],
      [ 6.3551,  2.5088, ...],
      ...
    ])
}]
The output contains a bounding box in [x1, y1, x2, y2] format, a predicted label, and a score for every detected object. It also contains keypoints in [[x1, y1, visibility1], [x2, y2, visibility2], ...] format and corresponding keypoint scores in [score1, score2, ...] format.
The frame with the predicted keypoints is shown below:
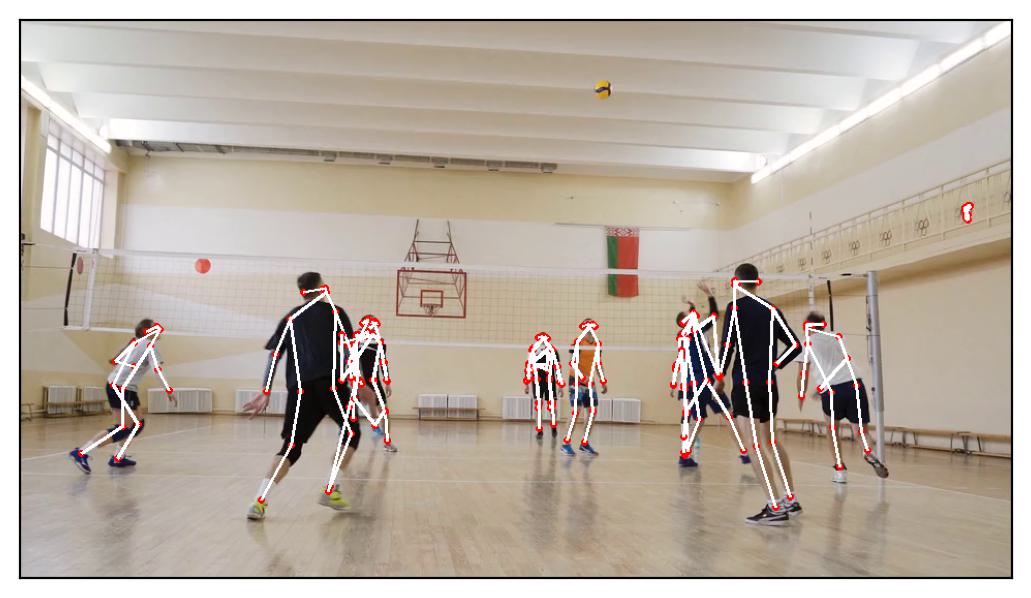
Image showing the first frame of pexels-pavel-danilyuk-6216952.mp4 with keypoint predictions from Keypoint RCNN.
To use the keypoints in LightlyOne we have to convert them to json files in the Lightly keypoint prediction format. We summarize here the most important points when working with keypoint detection predictions and videos.
- The filename of the json prediction should match this format:
{VIDEO_NAME}-{FRAME_NUMBER}-{VIDEO_EXTENSION}.json - Locations and distances are measured in pixels.
- Bounding boxes are optional. If no bounding boxes are specified, then LightlyOne will automatically infer them from the keypoints.
An example prediction is shown below:
{
  "predictions": [
    {
      "category_id": 1,
     	// keypoints in [x1, y1, s1, x2, y2, s2, ...] format where x and y are pixel coordinates
      // and s are the keypoint scores
      "keypoints": [135, 299, 11.4404, 132, 296, 8.5939, ...],
      "score": 0.9999,
      "bbox": [45, 287, 106, 151], // x, y, w, h coordinates in pixels
    },
    ...
  ]
}
We can now create a script that creates the tasks.json file, a schema.json and the predictions for all the videos and saves them to a new predictions directory.
import av
import json
from pathlib import Path
import torch
from torchvision.models.detection import (
    keypointrcnn_resnet50_fpn,
    KeypointRCNN_ResNet50_FPN_Weights,
)
import torchvision.transforms.functional as F

data_path = Path("data")
predictions_path = Path("predictions")
task_name = "keypoint_rcnn_detection"


# create tasks.json
tasks = [task_name]
tasks_path = predictions_path / "tasks.json"
tasks_path.parent.mkdir(parents=True, exist_ok=True)
with tasks_path.open("w") as file:
    json.dump(tasks, file, indent=4)


# create schema.json
schema = {
    "task_type": "keypoint-detection",
    "categories": [
        {
            "id": 1,
            "name": "person",
        }
    ],
}
schema_path = predictions_path / task_name / "schema.json"
schema_path.parent.mkdir(parents=True, exist_ok=True)
with schema_path.open("w") as file:
    json.dump(schema, file, indent=4)

# load model
model = keypointrcnn_resnet50_fpn(weights=KeypointRCNN_ResNet50_FPN_Weights.COCO_V1)
model.eval()
device = "cuda" if torch.cuda.is_available() else "cpu"
model.to(device)


# define helper functions
def lightly_predictions_from_torch_output(output):
    """Convert Torch output to Lightly prediction."""
    output = {key: val.tolist() for key, val in output.items()}
    predictions = []
    for i in range(len(output["keypoints"])):
        keypoints = []
        for (x, y, _), s in zip(
            output["keypoints"][i],
            output["keypoints_scores"][i],
        ):
            # apply sigmoid to keypoint score as lightly requires scores to be in [0, 1]
            # but the model returns keypoint scores in (-inf, +inf)
            s = torch.sigmoid(torch.tensor([s])).item()
            keypoints.extend([int(x), int(y), float(s)])
        x1, y1, x2, y2 = output["boxes"][i]
        w = x2 - x1
        h = y2 - y1
        predictions.append(
            {
                "category_id": output["labels"][i],
                "keypoints": keypoints,
                "score": output["scores"][i],
                "bbox": [int(x1), int(y1), int(w), int(h)],
            }
        )
    return predictions


def model_predict(frame):
    """Get Lightly prediction for a single frame."""
    frame_tensor = F.to_tensor(frame).to(device)
    output = model(frame_tensor.unsqueeze(0))[0]
    predictions = lightly_predictions_from_torch_output(output)
    return predictions


# create keypoint predictions
for video_path in data_path.glob("*.mp4"):
    print(f"Creating predictions for {video_path}...")

    # get predictions for frames
    predictions = []
    with av.open(str(video_path)) as container:
        stream = container.streams.video[0]
        for frame in container.decode(stream):
            predictions.append(model_predict(frame.to_image()))

    # save predictions
    num_frames = len(predictions)
    zero_padding = len(str(num_frames))
    for frame_index, frame_predictions in enumerate(predictions):
        video_name = video_path.relative_to(data_path).with_suffix("")
        frame_name = Path(
            f"{video_name}-{frame_index:0{zero_padding}}-{video_path.suffix[1:]}.png"
        )
        prediction = {
            "predictions": frame_predictions,
        }
        out_path = predictions_path / task_name / frame_name.with_suffix(".json")
        out_path.parent.mkdir(parents=True, exist_ok=True)
        print(out_path)
        with open(out_path, "w") as file:
            json.dump(prediction, file, indent=4)
Metadata
With the predictions, we can select video frames using active learning. But when working with videos it is also often helpful to balance the selection across videos to avoid selecting too many frames from a single video. This can happen if some of your videos are significantly longer than others.
LightlyOne also supports working with metadata. There are many possible inputs that can be used as metadata. For example, the location of the Volleyball game, the names of the competing teams, etc. In this tutorial, we use the video name as metadata to balance the selection across videos.
We create a metadata file per video and save the video name in it. We also create a metadata schema.json to make the metadata accessible to Lightly.
import json
from pathlib import Path

data_path = Path("data")
metadata_path = Path("metadata")

# create metadata schema.json
schema = [
    {
        "name": "Video Name",
        "path": "video_name",
        "defaultValue": "undefined",
        "valueDataType": "CATEGORICAL_STRING",
    }
]
schema_path = metadata_path / "schema.json"
schema_path.parent.mkdir(parents=True, exist_ok=True)
with open(schema_path, "w") as file:
    json.dump(schema, file, indent=4)

# create metadata files for all videos
for video_path in data_path.glob("*.mp4"):
    filename = video_path.relative_to(data_path)
    metadata = {
        "type": "video",
        "metadata": {"video_name": str(filename)},
    }

    metadata_filepath = metadata_path / filename.with_suffix(".json")
    metadata_filepath.parent.mkdir(parents=True, exist_ok=True)
    with metadata_filepath.open("w") as file:
        json.dump(metadata, file, indent=4)
The metadata files should look like this:
{
    "type": "video",
    "metadata": {
        "video_name": "pexels-pavel-danilyuk-6216952.mp4"
    }
}
Upload Data to Your Cloud Storage
You should now have a folder structure that looks like this:
.
├── data
│   ├── pexels-pavel-danilyuk-6216952.mp4
│   ├── pexels-pavel-danilyuk-6216955.mp4
│   ├── pexels-pavel-danilyuk-6217178.mp4
│   ├── pexels-pavel-danilyuk-6217182.mp4
│   └── pexels-pavel-danilyuk-6217183.mp4
├── first_frame.jpg
├── metadata
│   ├── pexels-pavel-danilyuk-6216952.json
│   ├── pexels-pavel-danilyuk-6216955.json
│   ├── pexels-pavel-danilyuk-6217178.json
│   ├── pexels-pavel-danilyuk-6217182.json
│   ├── pexels-pavel-danilyuk-6217183.json
│   └── schema.json
└── predictions
    ├── keypoint_rcnn_detection
    │   ├── pexels-pavel-danilyuk-6216952-000-mp4.json
    │   ├── pexels-pavel-danilyuk-6216952-001-mp4.json
    │   ├── pexels-pavel-danilyuk-6216952-002-mp4.json
    │   ├── ...
    │   ├── pexels-pavel-danilyuk-6217183-404-mp4.json
    │   └── schema.json
    └── tasks.json
Next, we have to upload the data to cloud storage so LightlyOne can process it. In this example, we use AWS S3 but Lightly is also compatible with Azure or Google Cloud Storage.
aws s3 cp data/ s3://bucket/input/volleyball --recursive
aws s3 cp predictions/ s3://bucket/lightly/volleyball/.lightly/predictions --recursive
aws s3 cp metadata/ s3://bucket/lightly/volleyball/.lightly/metadata --recursive
In the S3 bucket, the structure should now look as follows. Note that we have two folders, one for the input data (the videos) and one for LightlyOne (where we have predictions and metadata). We separate these two because LightlyOne also uses the second bucket to store temporary information such as thumbnails or extracted frames.
s3://bucket/input/volleyball
├── pexels-pavel-danilyuk-6216952.mp4
├── pexels-pavel-danilyuk-6216955.mp4
├── pexels-pavel-danilyuk-6217178.mp4
├── pexels-pavel-danilyuk-6217182.mp4
└── pexels-pavel-danilyuk-6217183.mp4

s3://bucket/lightly/volleyball
└──.lightly
    ├── metadata
    │   ├── pexels-pavel-danilyuk-6216952.json
    │   ├── pexels-pavel-danilyuk-6216955.json
    │   ├── pexels-pavel-danilyuk-6217178.json
    │   ├── pexels-pavel-danilyuk-6217182.json
    │   ├── pexels-pavel-danilyuk-6217183.json
    │   └── schema.json
    └── predictions
        ├── keypoint_rcnn_detection
        │   ├── pexels-pavel-danilyuk-6216952-000-mp4.json
        │   ├── pexels-pavel-danilyuk-6216952-001-mp4.json
        │   ├── pexels-pavel-danilyuk-6216952-002-mp4.json
        │   ├── ...
        │   ├── pexels-pavel-danilyuk-6217183-404-mp4.json
        │   └── schema.json
        └── tasks.json
Process the Dataset
We have all the data (videos + metadata + predictions) synced in our cloud bucket and can start with the processing. LightlyOne is designed to have a processing engine, the LightlyOne Worker, running in a docker container. You can just run the following command on a machine with a GPU to start the worker.
docker run --shm-size="1024m" --gpus all --rm -it \
      -e LIGHTLY_TOKEN={MY_LIGHTLY_TOKEN} \
      lightly/worker:latest
Once the worker is up and running, we can create a job to process our data. We follow the other tutorials and create a simple Python script to perform these steps:
- Instantiate a Lightly client and authenticate it using the token.
- Create a datasource to connect to our S3 buckets.
- Schedule the run based on our data selection criteria.
from lightly.api import ApiWorkflowClient
from lightly.openapi_generated.swagger_client import DatasetType, DatasourcePurpose


# Create the LightlyOne client to connect to the API.
client = ApiWorkflowClient(token="MY_LIGHTLY_TOKEN")

# Create a new dataset on the LightlyOne Platform.
client.create_dataset(dataset_name="volleyball-tutorial", dataset_type=DatasetType.VIDEOS)
dataset_id = client.dataset_id

# Configure the Input datasource.
client.set_s3_delegated_access_config(
    resource_path="s3://bucket/input/volleyball/",
    region="us-east-1",
    role_arn="S3-ROLE-ARN",
    external_id="S3-EXTERNAL-ID",
    purpose=DatasourcePurpose.INPUT,
)
# Configure the Lightly datasource.
client.set_s3_delegated_access_config(
    resource_path="s3://bucket/lightly/volleyball/",
    region="us-east-1",
    role_arn="S3-ROLE-ARN",
    external_id="S3-EXTERNAL-ID",
    purpose=DatasourcePurpose.LIGHTLY,
)

scheduled_run_id = client.schedule_compute_worker_run(
    worker_config={},
    selection_config={
        "n_samples": 100,
        "strategies": [
            {
                # strategy to find diverse objects
                "input": {
                    "type": "EMBEDDINGS",
                    "task": "keypoint_rcnn_detection",
                },
                "strategy": {
                    "type": "DIVERSITY",
                },
            },
            {
                # strategy to select images with more objects
                "input": {
                    "type": "PREDICTIONS",
                    "task": "keypoint_rcnn_detection",
                    "name": "CATEGORY_COUNT"
                },
                "strategy": {
                    "type": "WEIGHTS"
                },
            },
            {
                # strategy to select images with low prediction confidence (Active Learning)
                "input": {
                    "type": "SCORES",
                    "task": "keypoint_rcnn_detection",
                    "score": "objectness_least_confidence"
                },
                "strategy": {
                    "type": "WEIGHTS"
                },
            },
            {
                # strategy to balance across videos
                "input": {
                    "type": "METADATA",
                    "key": "video_name"
                },
                "strategy": {
                    "type": "BALANCE",
                    "target": {
                        "pexels-pavel-danilyuk-6216952.mp4": 0.2,
                        "pexels-pavel-danilyuk-6216955.mp4": 0.2,
                        "pexels-pavel-danilyuk-6217178.mp4": 0.2,
                        "pexels-pavel-danilyuk-6217182.mp4": 0.2,
                        "pexels-pavel-danilyuk-6217183.mp4": 0.2,
                    }

                },
            }
        ],
    },
    lightly_config={}
)
Analyze the Results
Whenever you process a dataset with the LightlyOne Solution, you will have access to the following results:
- A completed LightlyOne Worker run with artifacts such as model checkpoints and logs.
- A PDF report that summarizes what data has been selected and why.
- Furthermore, our dataset in the LightlyOne Platform now contains the selected images.
PDF Report
Looking at the PDF report, we can find different information, such as the number of selected images, the processing time, and various statistics about the input and output data. One interesting statistic is the comparison between the number of objects in the input and output data, shown in the figure below. The histogram shows only one bar as we have a single person class in the dataset. But looking at the right y-axis with the average number of objects per image, we can see that the number increased from 16% in the input data to about 24% in the output data. This is because we told the LightlyOne Worker to focus on images with many objects in them using a CATEGORY_COUNT prediction selection strategy.
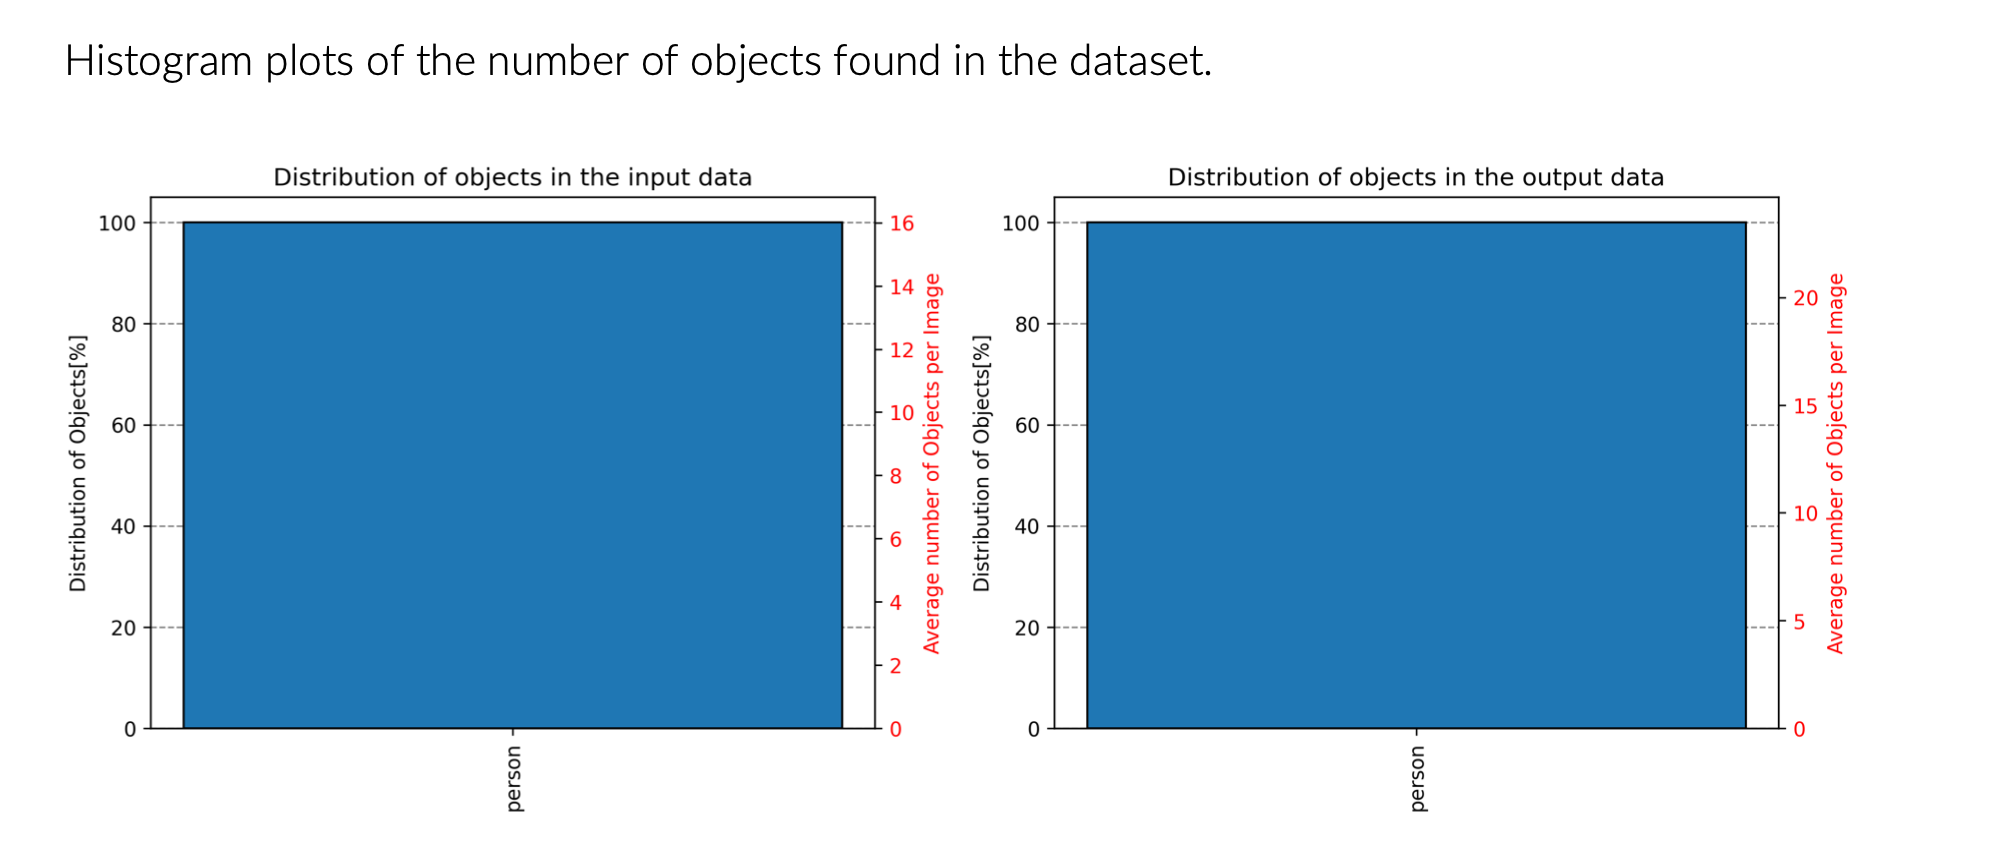
Number of objects before and after selection. The average number of objects per image increases from 16% to about 24%.
LightlyOne Platform
Heading over to the LightlyOne Platform, we discover that the LightlyOne Worker uploaded two new datasets:
volleyball-tutorialwith the selected images.volleyball-tutorial-crops-keypoint_rcnn_detectionwith all cropped objects from the selected images.
We can now explore the datasets in the LightlyOne Platform and look at the selected images in detail. Sorting the selected object crops by their prediction score reveals that LightlyOne selected some really difficult examples as shown in the image below. Note that the selected objects are not only difficult but also diverse. They depict different scenes, persons, positions, and image resolutions. A diverse dataset prepares your model for many different situations and allows it to generalize better.
The combination of low scores and diverse objects was achieved with two selection strategies. We selected images based on their object prediction scores using active learning with the objectness_least_confidence score. As the name suggests, this selects objects with low prediction scores. On top of this, we added an object diversity strategy that tries to maximize the visual difference between the selected objects.
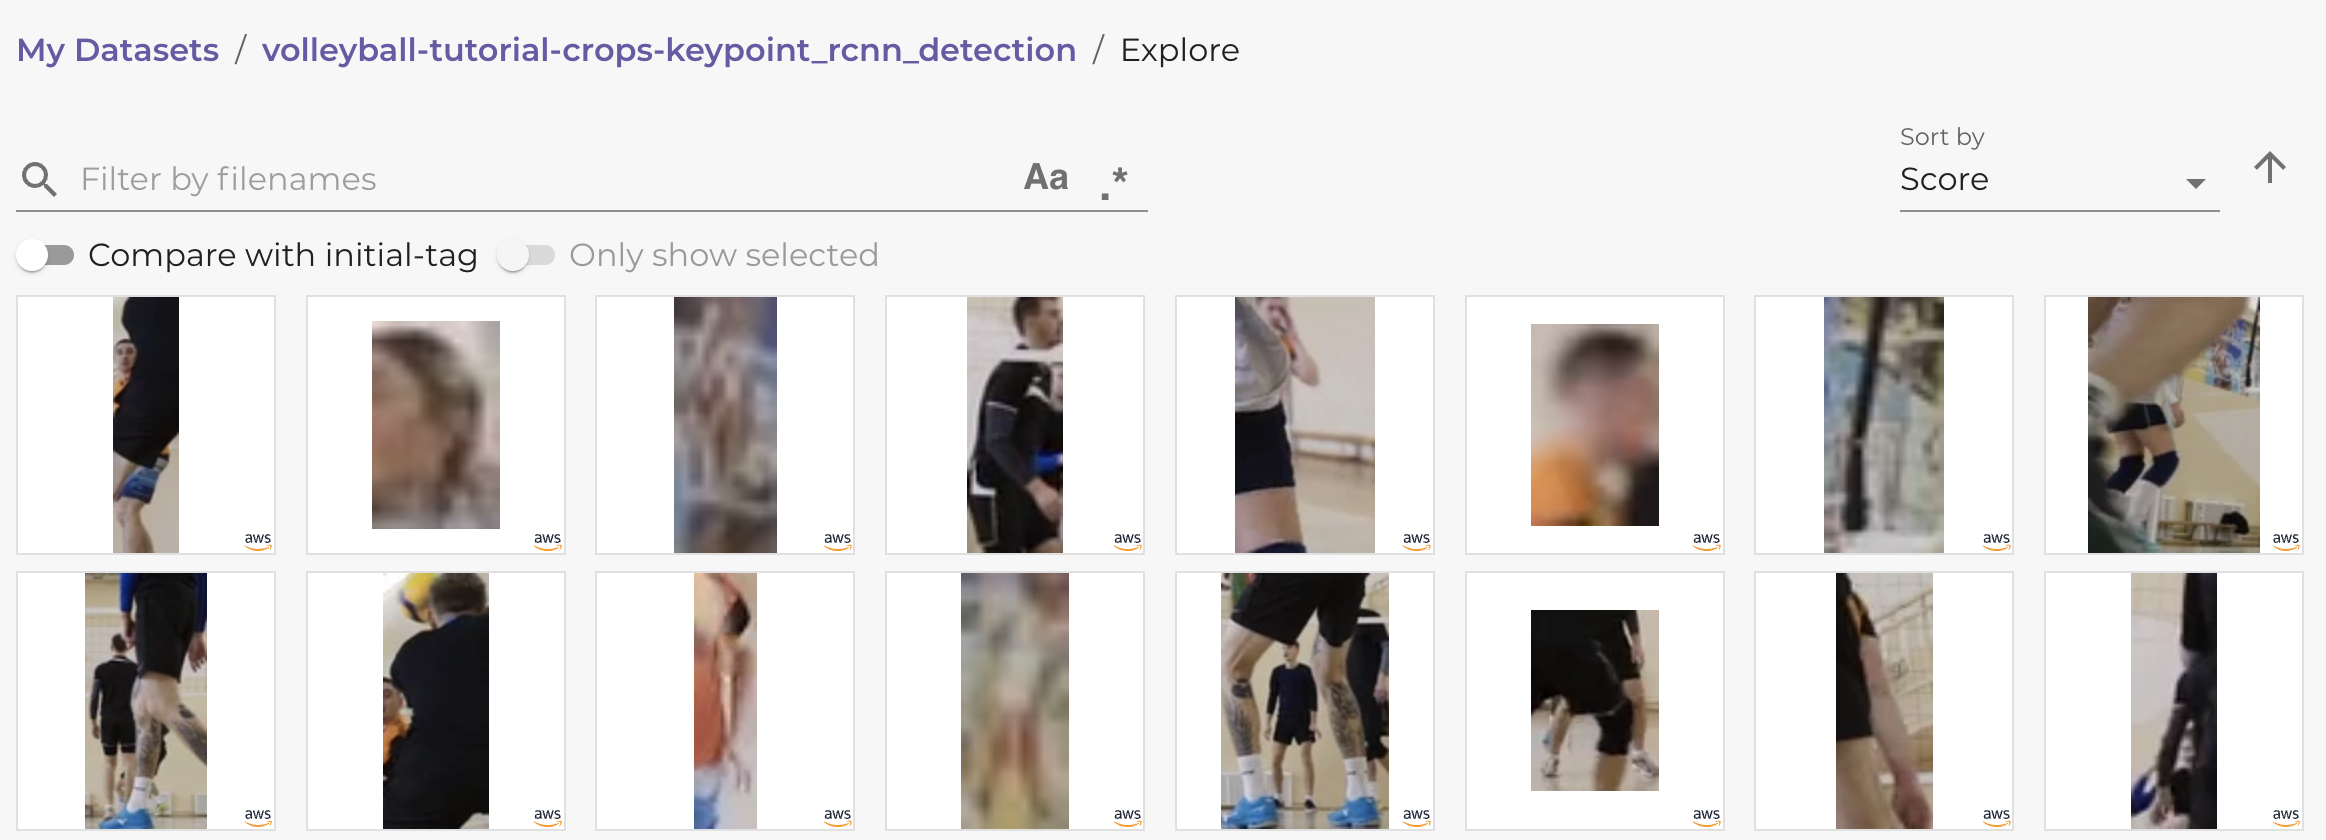
Selected objects with low prediction scores and high visual diversity.
The embedding view gives us a quick overview of the selected images. In the example image below, we colored the embeddings by their prediction score. A dark color indicates a low score and a bright color a high score. Looking at the image, we can see that the keypoint prediction model struggles with scenes containing overlapping persons in nearly identical positions (highlighted on the top right). Adding those examples to the next training iteration for the keypoint prediction model should improve the performance in such tricky situations.
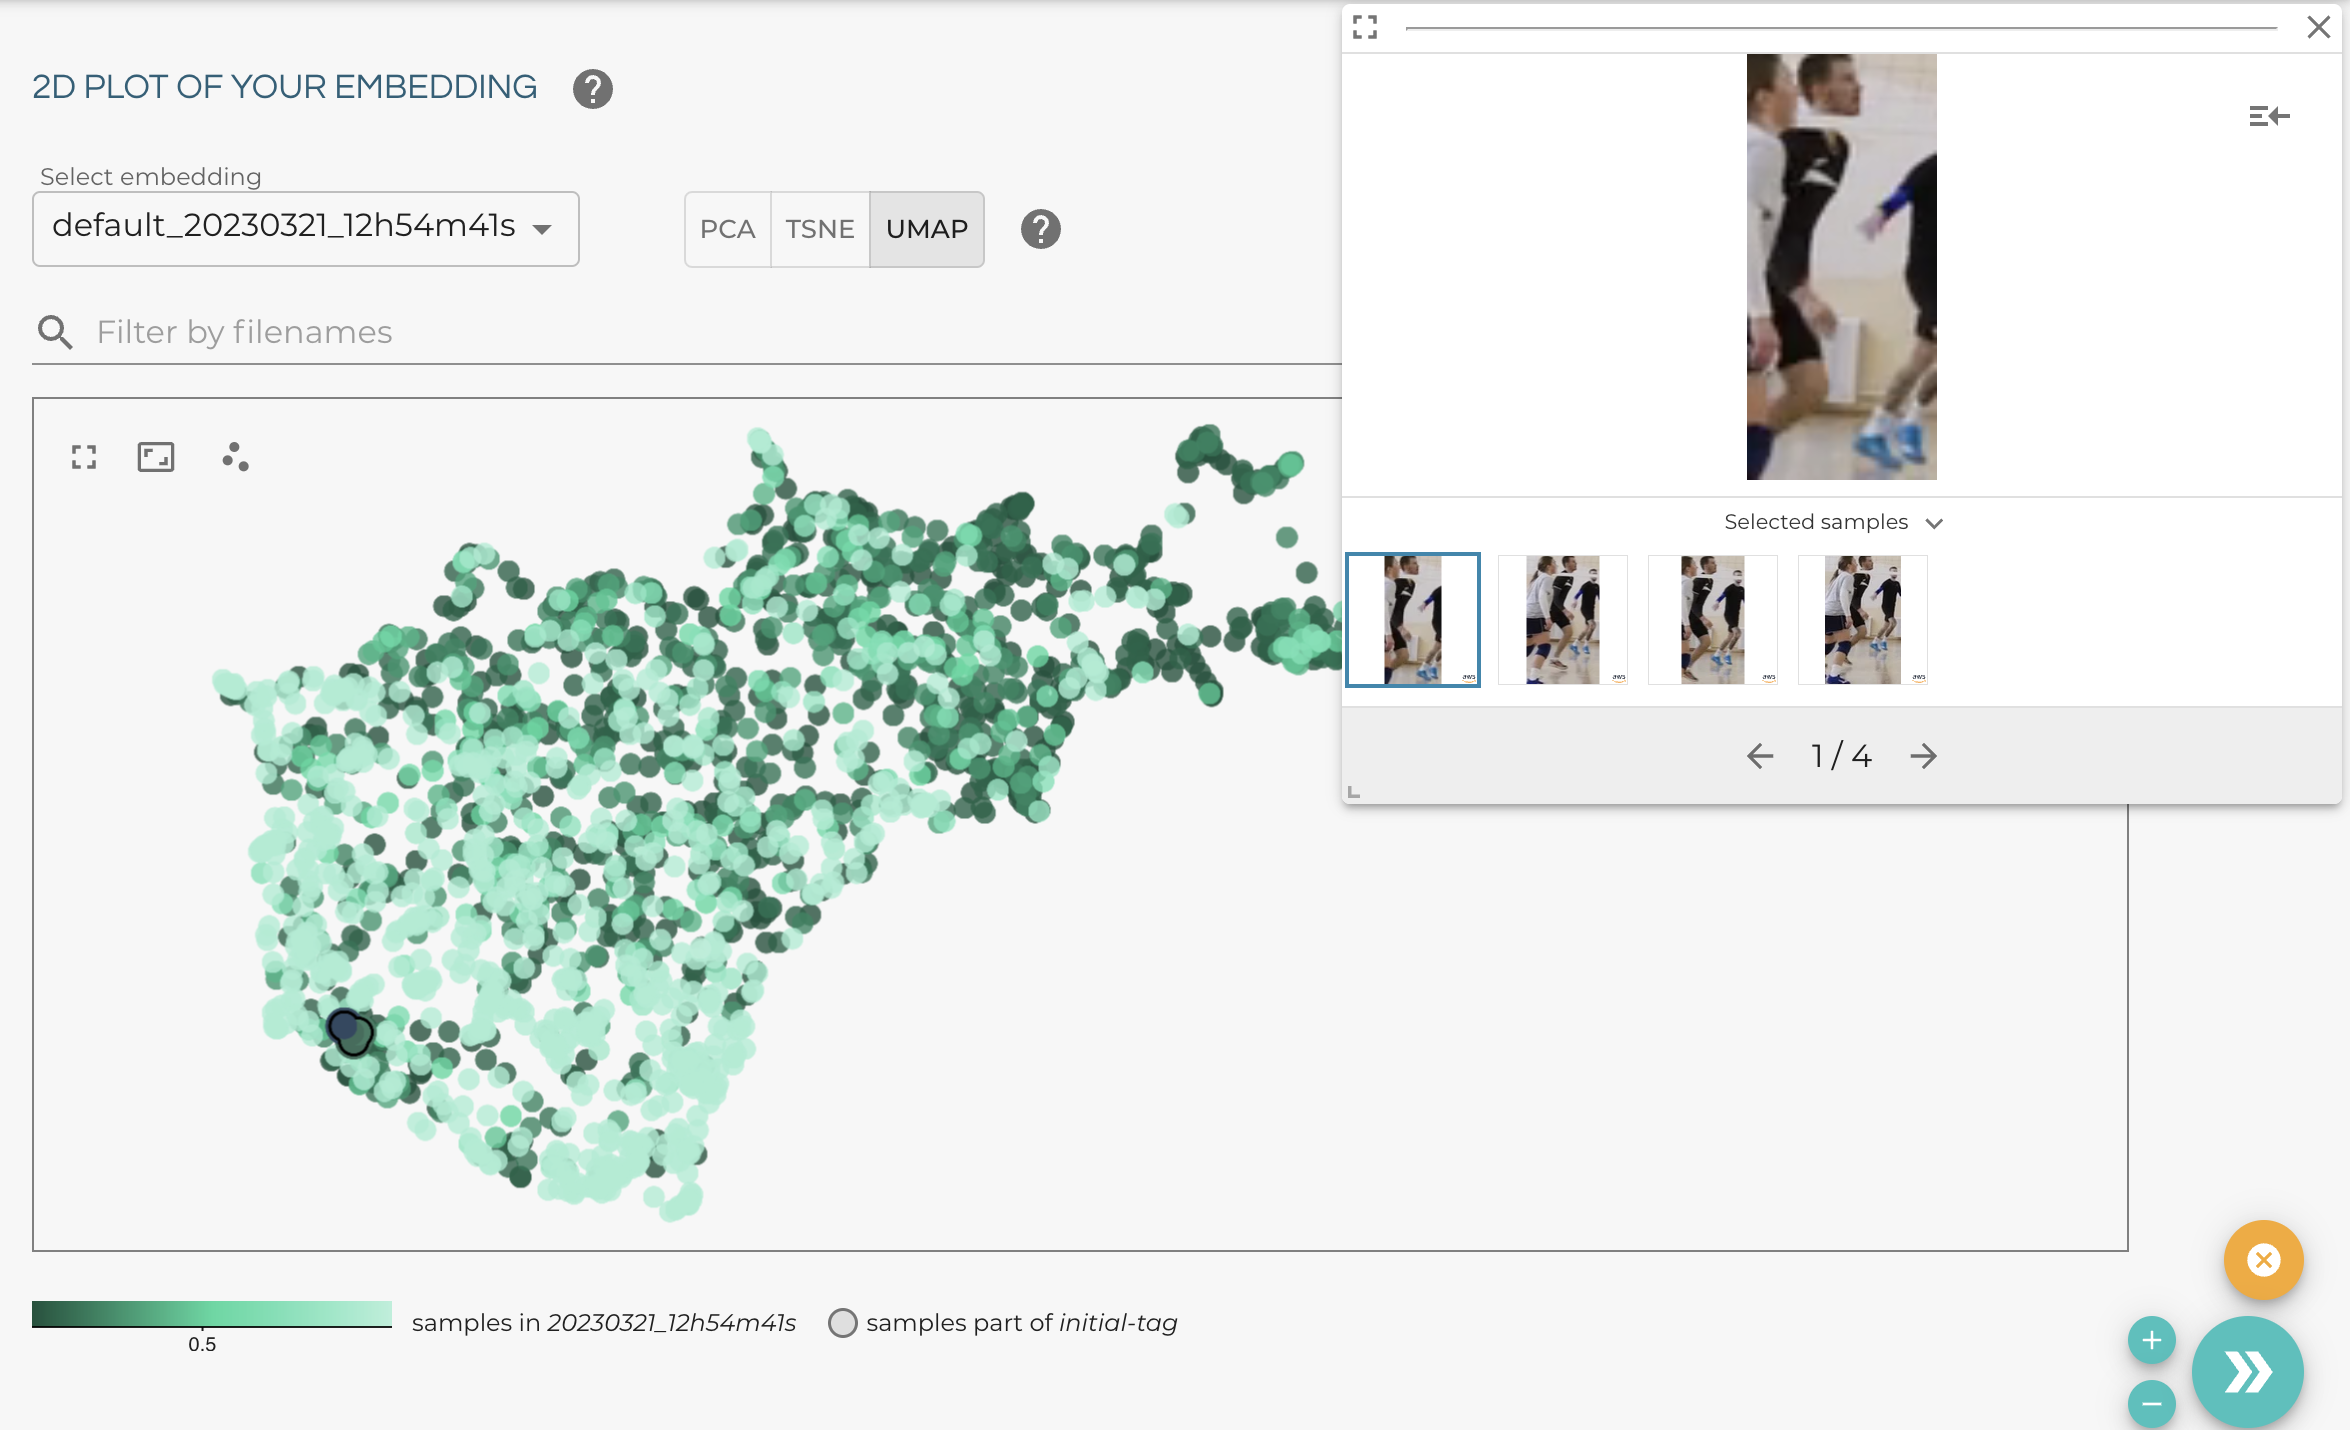
Embedding view in the LightlyOne Platform. A dark color indicates a low prediction score and a bright color a high prediction score. The preview on the top right shows some examples with low scores.
Export the Video Frames for Labeling
If we want to export the selected data for labeling, we want the filenames and the signed URLs to access the frames. The filenames contain the video name and the frame number. But since we used LightlyOne directly on videos, we would need to extract the frames again to get the data we want for labeling.
Luckily, LightlyOne extracts the data of the selected frames automatically and stores them in the LightlyOne bucket we defined above. This is the same bucket we used to store metadata and predictions. We can export the selected images as follows:
from lightly.api import ApiWorkflowClient

# Create the Lightly client to connect to the API.
# You can also combine this with the script above and reuse the client.
client = ApiWorkflowClient(token="MY_LIGHTLY_TOKEN", dataset_id="MY_DATASET_ID")

# get the filenames with signed read URLs
filenames_and_read_urls = client.export_filenames_and_read_urls_by_tag_name(
    tag_name="initial-tag"  # name of the tag in the dataset
)
with open("filenames-and-readurls-of-initial-tag.json", "w") as f:
    json.dump(filenames_and_read_urls, f)
Updated 7 months ago
