Assertion-based Active Learning with YOLOv8
Use this guide to integrate your scene knowledge into an assertion-based active learning algorithm to select the best frames to label in your unlabeled dataset
When dealing with tasks like autonomous driving or video surveillance, we have hints about the object's behavior in the scene. For example, let's take a video of a car moving. If we take three subsequent video frames, we can confidently assume that if the car is present in the first and third frames, it should also be there in the second. This assertion can be modeled and used to do active learning.
In particular, what we are going to do in this tutorial is to select images based on prediction flickering. If a model predicts a bounding box for frames 1 and 3 but not for frame 2, we will select frame 2 to label, as it is problematic for our model, and we can improve our model's performance by labeling it.

Flickering as described in Model Assertions for Monitoring and Improving ML Models, 2020
This technique has proven effective in the paper Model Assertions for Monitoring and Improving ML Models, 2020. The particular kind of assertion we will use is referenced as flickering in the literature.
This tutorial will show you how to combine a flickering assertion with LightlyOne selection techniques. The provided code assumes linear motion between frames. To match the bounding boxes of the previous and the next frame, the IoU score is used. For other use cases, you should be able to build your custom assertion to have good results on your task.
Setup
For this tutorial we use the following video from Pexels:
- Video from MR THE STORIES: https://www.pexels.com/de-de/video/strasse-verkehr-wetter-auto-10920694/
The video shows a front-facing camera from a car in bad weather and traffic. There are several cars driving on different lanes. Bad weather is especially challenging for our model we expect many false negatives that result in flickering.
As our object detector, we will use a pertained YOLOv8. I suggest you also read our tutorial about Improving YOLOv8 using Active Learning on Videos, which explains in more detail how to use YOLOv8 on videos with Lightly.
Prerequisites
For this tutorial, you will need the following things:
- Have LightlyOne installed and setup.
- Access to a cloud bucket to which you can upload your dataset. The following tutorial will use an AWS S3 bucket.
- To use the YOLOv8 model, look at the official GitHub repository.
- Download the video on the machine where you want to run the YOLOv8 model
- We recommend using
Python 3.7or newer.
For this part, we will follow the steps in Improving YOLOv8 using Active Learning on Videos
Download and unzip the dataset
Download the video. We picked the SD 540x960 version for our experiments. You might need to download it and copy it to your machine, where you will run the YOLOv8 model.
We assume you create a folder called data/ to store the video.
You should now have this folder structure
data/
└── 3077573147.mp4
Get Video Predictions using YOLOv8
To get predictions we first need to have a model. We can install the new YOLOv8 model directly using pip. And while doing that, we can also install Lightly Python Client within the same shell command:
pip install ultralytics lightly
Package VersionsWe tested this tutorial using a
Python 3.10environment and the following package versions:ultralytics==8.0.42 lightly==1.2.44
Before jumping right into the rest of the tutorial we can have a look whether there are even flickering bounding boxes in our video. To do so we run a single command with the new YOLOv8 CLI interface.
The following command does the following:
- it uses the
yolov8x.ptcheckpoint (if not locally available it will download it) - it uses the video in our input folder
data/3077573147.mp4 - it saves a copy of that video with predictions overlayed
save=True - and we only consider class with id
2which are cars
yolo detect predict model=yolov8x.pt source="data/3077573147.mp4" save=True classes=[2]Running that command, you create a new video in a folder similar to runs/detect/predict/3077573147.mp4 with a video similar to the one below.
As you see, we have quite some flickering of our predictions. Let's see how we can use them for assertion-based active learning.
Preparing the Predictions
Now, let's get predictions for our videos. The YOLOv8 model has a very simple interface. We instantiate the class, and the model automatically downloads a checkpoint (trained on MS COCO). We can use the YOLO class's .predict(...) method to get predictions.
Finally, we can iterate over the results and add them to a list of predictions.
Since we want to improve our existing model, we want to work with a much lower confidence threshold. We set it to 0.1 instead of 0.25, which is the default. This can help us find potential false negatives to be included in the next labeling iteration.
To use the predictions in the LightlyOne data curation pipeline, we need to convert them to the right format. YOLO has the same format as the one of YOLOv7 we use in another tutorial:
[x_min, y_min, x_max, y_max, conf, class_index]
We need to translate it to Lightly's prediction format. We summarize here the most important points when working with object detection and videos.
- The filename of the json prediction should match this format:
{VIDEO_NAME}-{FRAME_NUMBER}-{VIDEO_EXTENSION}.json
{
    "predictions": [
        {
            "category_id": 2, 						// COCO category for car
            "bbox": [248, 212, 619, 390], // x, y, w, h coordinates in pixels
                                        	// x, y >= 0 and w, h >= 1
            "score": 0.8930209279060364   // score is our prediction probability in [0, 1]
        }
    ]
}
We can now write code that creates the tasks.json file, a schema.json, and the videos' predictions. Note that we also create prediction files for images without predictions. This will be useful for recognizing images without any object. You don't need to execute the script yet but can run it later combined with the later script to compute the model assertions.
from ultralytics import YOLO
from pathlib import Path
import json

model = YOLO("yolov8x.pt")  # load a pretrained model (recommended for training)

predictions_root_path = Path("predictions")
task_name = "yolov8_detection"
predictions_path = Path(predictions_root_path / task_name)

important_classes = {"car": 2}

classes = list(important_classes.values())

# create tasks.json
tasks_json_path = predictions_root_path / "tasks.json"
tasks_json_path.parent.mkdir(parents=True, exist_ok=True)

with open(tasks_json_path, "w") as f:
    json.dump([task_name], f)


# create schema.json
schema = {"task_type": "object-detection", "categories": []}
for key, val in important_classes.items():
    cat = {"id": val, "name": key}
    schema["categories"].append(cat)

schema_path = predictions_path / "schema.json"
schema_path.parent.mkdir(parents=True, exist_ok=True)

with open(schema_path, "w") as f:
    json.dump(schema, f, indent=4)


videos = Path("data/").glob("*.mp4")

filename_to_prediction = {}

for video in videos:
    results = model.predict(video, conf=0.1)
    predictions = [result.boxes.boxes for result in results]

    # convert filename to lightly format
    # 'data/video_1.mp4' --> 'data/video_1-053-mp4.json'
    number_of_frames = len(predictions)
    padding = len(str(number_of_frames))  # '123' --> 3 digits
    fname = video

    for idx, prediction in enumerate(predictions):
        fname_prediction = (
            f"{fname.parents[0] / fname.stem}-{idx:0{padding}d}-{fname.suffix[1:]}.json"
        )

        # treats extracted frames from videos as PNGs
        lightly_prediction = {
            "predictions": [],
        }

        for pred in prediction:
            x0, y0, x1, y1, conf, class_id = pred

            # skip predictions thare are not part of the important_classes
            if class_id in important_classes.values():
                # note that we need to conver form x0, y0, x1, y1 to x, y, w, h format
                pred = {
                    "category_id": int(class_id),
                    "bbox": [int(x0), int(y0), int(x1 - x0), int(y1 - y0)],
                    "score": float(conf),
                }
                lightly_prediction["predictions"].append(pred)

        # we keep all predictions for computing the model assertions later
        filename = str(Path(fname_prediction))
        filename_to_prediction[filename] = lightly_prediction

        if len(lightly_prediction['predictions']) > 0:
            # create the prediction file for the image
            path_to_prediction = predictions_path / Path(
                fname_prediction
            ).with_suffix(".json")

            path_to_prediction.parents[0].mkdir(parents=True, exist_ok=True)
            with open(path_to_prediction, "w") as f:
                json.dump(lightly_prediction, f, indent=4)
The above code also stored all the model predictions in a dictionary called filename_to_prediction. It maps the filename to the predictions in the Lightly format. We will use this dictionary later to compute the model assertion.
{
 'predictions': [{'category_id': 2,
   'bbox': [273, 567, 48, 34],
   'score': 0.804517388343811},
  {'category_id': 2, 'bbox': [124, 557, 115, 93], 'score': 0.7493121027946472},
  {'category_id': 2, 'bbox': [354, 558, 53, 41], 'score': 0.7186271548271179},
  {'category_id': 2, 'bbox': [218, 559, 26, 27], 'score': 0.5840434432029724}]}
Model assertion
Now that we have predictions, we can compute the model assertion and upload it as Lightly metadata. I suggest you read Work with Metadata to understand this feature more deeply.
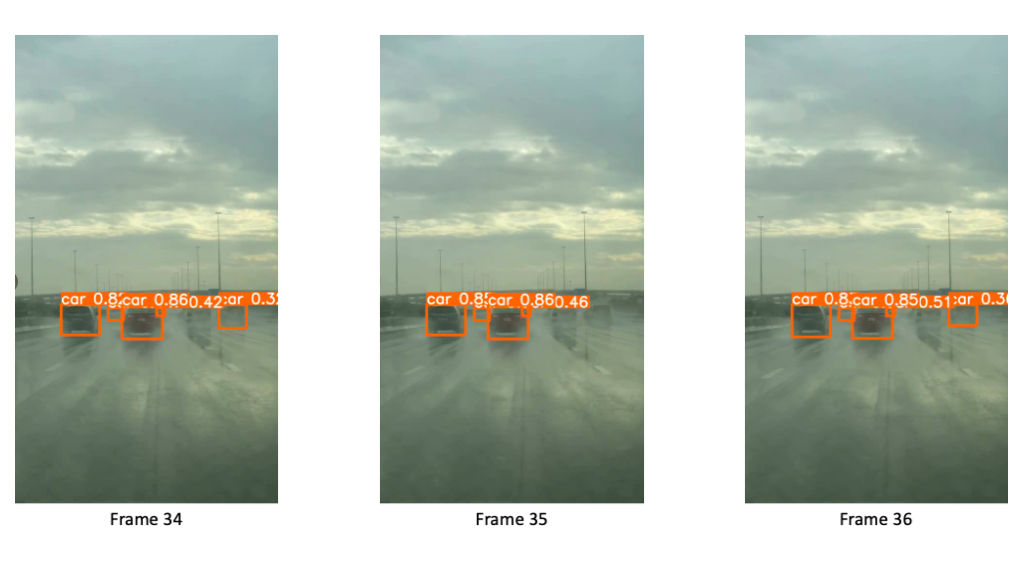
We can find a flickering assertion for frame 35. There is no prediction for the car on the right side. However, we have predictions for frames 34 and 36.
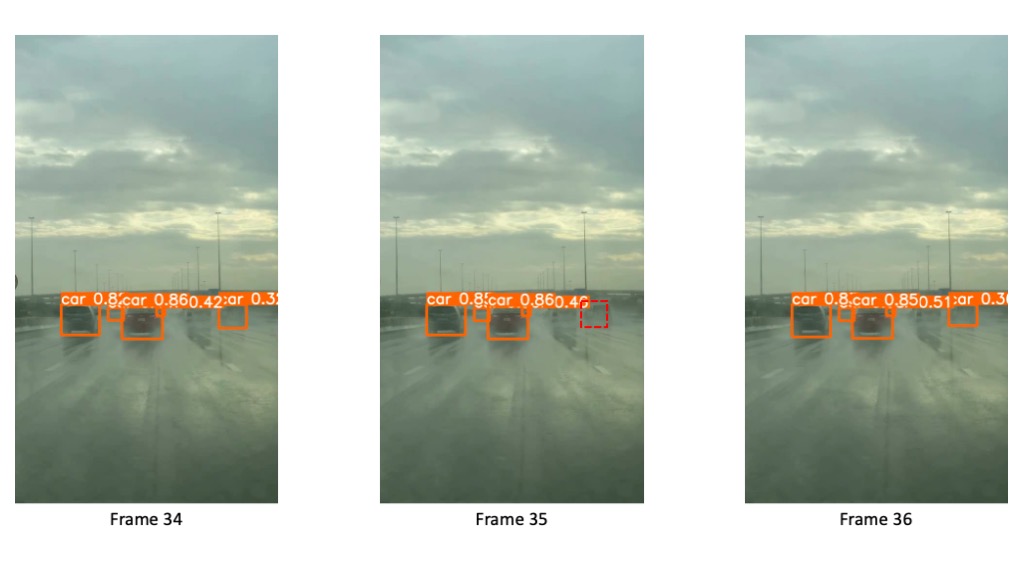
To compute the assertion we interpolate the bounding box for the center frame based on the previous and the next frame. The dashed bounding box in the center frame shows this mean prediction.
We will compute a flickering score for each frame and save it as metadata for each frame that should look like this:
{
    "type": "frame",
    "metadata": {
        "flickering": 1.0
    }
}
We will compute the flickering using the intersection over union metric (IoU). For each frame, we compute the IOU between all boxes in the previous and next frame. If this IOU exceeds a threshold, we consider the corresponding box in the previous and next frame matching and compute the mean between them as interpolated bounding box for the current frame. This is considered flickering if the current frame does not have a bounding box with a higher intersection with the interpolated box. By doing so, we will spot if the central image of the 2⋅windowing_size + 1 sized window has a flickering prediction.
To have an even better assertion, we cancel out an empty prediction for each window. Moreover, if the window is fully composed of empty predictions, we assign the flickering score to the median of the flickering scores. Doing so assures that we select images without predictions with equal probability as the ones with predictions.
Ultimately, we translate the flickering scores to the Lightly metadata format.
The following Python code computes the flickering score and saves it as Lightly metadata. Note that the code requires the filename_to_prediction from the previous code to run.
from torchvision import ops
import torch
import json
from pathlib import Path
import numpy as np

def bbox_converter(bbox):
    """Convert from x, y, w, h format to x0, y0, x1, y1"""
    x, y, w, h = bbox
    x1 = x + w
    y1 = y + h
    return [x, y, x1, y1]


def compute_flickering_assertion(
    predictions_list,
    iou_thresh_tracking=0.9,
    iou_thresh_assertion=0.6,
):
    """Computes a flickering score and imputed boxes for a sequence of bounding boxes.

    For the computation of the flickering score we look at previous and next frames.
    The output is a list of boolean elements that indicate whether flickering
    was present or not.

    To determine if bounding boxes are connected we use a primitive
    matching method based on IoU thresholding.
    For example, if a bounding box of frame i-1 and i+1 has a large IoU (overlap)
    we assume that this is the same object.
    We then compute the mean of the two boxes to estimate where the bounding box
    of frame i should be.
    If there is a large IoU between the mean box and a box in frame i
    we have a valid prediction. In case there is no box in frame i that has a
    large IoU we assume that there is a missing prediction and set assertion to true.

    Expected input format of the predictions_list
    [
        {
            'predictions': [
                {'category_id': 2,
                'bbox': [456, 334, 35, 22],
                'score': 0.6186114549636841}
            ]
        },
    ]

    Arguments:
        predictions_list: List of list of all predictions in an image
        iou_thresh_tracking: Lower limit of IoU used for tracking
        iou_thresh_assertion: Upper limit for IoU used for considering a missing prediction

    Returns:
        List of assertions. True if there was flickering, otherwise False.
        List of imputed bounding boxes based on the assertions.
    """

    window_size = 3  # we use a fixed window size of 3

    flickering_assertions = [False for _ in predictions_list]
    imputed_bounding_boxes = [[] for _ in predictions_list]
    half_window_size = window_size // 2

    for i in range(half_window_size, len(predictions_list) - half_window_size):
        predictions_window = []

        # we only care about frames where we have predictions in i-1 and i+1
        if (
            predictions_list[i - 1]["predictions"]
            and predictions_list[i + 1]["predictions"]
        ):
            # get all the bounding boxes into the right format
            prev_bboxes = [
                bbox_converter(x["bbox"])
                for x in predictions_list[i - 1]["predictions"]
            ]
            next_bboxes = [
                bbox_converter(x["bbox"])
                for x in predictions_list[i + 1]["predictions"]
            ]
            curr_bboxes = [
                bbox_converter(x["bbox"]) for x in predictions_list[i]["predictions"]
            ]

            prev_bboxes = torch.tensor(prev_bboxes, dtype=torch.int)
            next_bboxes = torch.tensor(next_bboxes, dtype=torch.int)
            curr_bboxes = torch.tensor(curr_bboxes, dtype=torch.int)

            # IoU NxM matrix between previous and next frame
            iou_prev_next = ops.box_iou(prev_bboxes, next_bboxes)

            # if any element is above iou_thresh_tracking
            # we call the two boxes between i-1 and i+1 matching
            if torch.any(iou_prev_next > iou_thresh_tracking):
                assertions = 0

                # we loop through all pairs of matched boxes between i-1 and i+1
                for prev_index, next_index in torch.nonzero(
                    iou_prev_next > iou_thresh_tracking
                ):
                    matching_boxes = torch.cat(
                        (
                            prev_bboxes[prev_index].unsqueeze(0),
                            next_bboxes[next_index].unsqueeze(0),
                        )
                    )
                    matching_boxes_mean = (
                        torch.mean(matching_boxes, dim=0, dtype=torch.float32)
                        .unsqueeze(0)
                        .int()
                    )

                    if len(curr_bboxes) == 0:
                        assertions += 1
                        imputed_bounding_boxes[i].append(matching_boxes_mean.tolist())
                        continue

                    # calculate the IoU of the mean box and boxes from the current frame
                    iou_curr_mean = ops.box_iou(curr_bboxes, matching_boxes_mean)

                    # check if there is a prediction in frame i that has a large IoU
                    if torch.all(iou_curr_mean < iou_thresh_assertion):
                        # all ious below threshold we have an assertion
                        assertions += 1
                        imputed_bounding_boxes[i].append(matching_boxes_mean.tolist())

                if assertions > 0:
                    flickering_assertions[i] = True

    return flickering_assertions, imputed_bounding_boxes


# use the filename_to_prediction dict from the previous code
filename_list, predictions_list = zip(*sorted(filename_to_prediction.items()))
flickering_assertions, imputed_bounding_boxes = compute_flickering_assertion(
    predictions_list,
    iou_thresh_tracking=0.8,  # increase for more strict tracking
    iou_thresh_assertion=0.6,
)

# Create the schema.json
schema = [
    {
        "name": "Flickering",
        "path": "flickering",
        "defaultValue": 0.5,
        "valueDataType": "NUMERIC_FLOAT",
    }
]

schema_path = Path("metadata/schema.json")
schema_path.parent.mkdir(parents=True, exist_ok=True)

with open(schema_path, "w") as f:
    json.dump(schema, f, indent=4)

# Dump the metadata
for i, filename in enumerate(filename_list):
    file_name_lightly = (
        Path(filename)
        .relative_to(fname.parent.parent)
        .with_suffix(".png")
    )

    flickering_value = 1.0 if flickering_assertions[i] else 0.5
    metadata = {
        "type": "frame",
        "metadata": {"flickering": flickering_value},
    }

    lightly_metadata_fname = "metadata" / file_name_lightly.with_suffix(".json")
    lightly_metadata_fname.parent.mkdir(parents=True, exist_ok=True)

    with open(lightly_metadata_fname, "w") as f:
        json.dump(metadata, f, indent=4)
We set the flickering value to 1.0 if flickering (missing prediction) and 0.5 if there was no flickering. We do this as we still want images without flickering to be considered in the selection process if the other selection criteria are met. To learn more about how different selection criteria are combined, look at Selection Strategy Combination.
Imputed Bounding BoxesThe provided code for computing the model assertions also returns a list of "imputed" bounding boxes. These are the boxes that should have been predicted based on our assertion. We could use that list as prelabeled data, as we can confidently say there should have been a bounding box.
Upload data to your cloud storage
You should now have a folder structure that looks more or less like this:
data/
└── 3077573147.mp4
predictions/
├── tasks.json
└── yolov8_detection/
		├── data/
    |   ├── 3077573147-000-mp4.json
    |   ├── ...
    |   └── 3077573147-499-mp4.json
		└── schema.json
metadata/
├── data/
|   ├── 3077573147-000-mp4.json
|   ├── ...
|   └── 3077573147-499-mp4.json
└── schema.json
What's left is uploading the data to cloud storage so LightlyOne can process it. In this example, we use AWS S3 but LightlyOne is also compatible with Azure or Google Cloud Storage.
TODO: This is quite some effort and error prone. Can't you cput all the data directly into a model_assertion_lightly bucket, so that one command is sufficient?
aws s3 cp data/ s3://bucket/input/model_assertion/data/ --recursive
aws s3 cp predictions/ s3://bucket/lightly/model_assertion/.lightly/predictions --recursive
aws s3 cp metadata/ s3://bucket/lightly/model_assertion/.lightly/metadata --recursive
In the S3 bucket the structure should now look like the following. Note that we have two folders, one for the input data (the videos) and one for lightly (where we have predictions and metadata). We separate these two because LightlyOne also uses the second bucket to store temporary information such as thumbnails or extracted frames.
s3://bucket/input/pedestrians/
└── 3077573147.mp4

s3://bucket/lightly/pedestrians/
└── .lightly/
        predictions/
        ├── tasks.json
        └── yolov8_detection/
            ├── data/
            |   ├── 3077573147-000-mp4.json
            |   ├── ...
            |   └── 3077573147-499-mp4.json
            └── schema.json
        metadata/
        ├── data/
        |   ├── 3077573147-000-mp4.json
        |   ├── ...
        |   └── 3077573147-499-mp4.json
        └── schema.json
Process the dataset
We have all the data (images + metadata + predictions) synced in our cloud bucket and can start with the processing. LightlyOne is designed to have a processing engine, the LightlyOne Worker, running in a docker container. You can install LightlyOne and then start the LightlyOne Worker with the command shown in the LightlyOne Platform.
Once the worker is up and running, we can create a job to process our data. We follow the other tutorials and create a simple Python script to perform these steps:
- Instantiate a LightlyOne client and authenticate it using the token
- Create a datasource to connect to our S3 buckets
- Schedule the run based on our data selection criteria
from lightly.api import ApiWorkflowClient
from lightly.openapi_generated.swagger_client import DatasetType
from lightly.openapi_generated.swagger_client import DatasourcePurpose


# Create the LightlyOne client to connect to the API.
client = ApiWorkflowClient(token="MY_LIGHTLY_TOKEN")

# Create a new dataset on the LightlyOne Platform.
client.create_dataset(
    dataset_name="assertion-based-yolov8", dataset_type=DatasetType.VIDEOS
)
dataset_id = client.dataset_id

# Configure the Input datasource.
client.set_s3_delegated_access_config(
    resource_path="s3://bucket/input/model_assertion/",
    region="eu-central-1",
    role_arn="S3-ROLE-ARN",
    external_id="S3-EXTERNAL-ID",
    purpose=DatasourcePurpose.INPUT,
)
# Configure the Lightly datasource.
client.set_s3_delegated_access_config(
    resource_path="s3://bucket/lightly/model_assertion/",
    region="eu-central-1",
    role_arn="S3-ROLE-ARN",
    external_id="S3-EXTERNAL-ID",
    purpose=DatasourcePurpose.LIGHTLY,
)

scheduled_run_id = client.schedule_compute_worker_run(
    worker_config={},
    selection_config={
        "n_samples": 100,
        "strategies": [
            {
                # strategy to find diverse objects
                "input": {
                    "type": "EMBEDDINGS",
                    "task": "yolov8_detection",
                },
                "strategy": {
                    "type": "DIVERSITY",
                },
            },
            {
                # strategy to use prediction score (Active Learning)
                "input": {
                    "type": "SCORES",
                    "task": "yolov8_detection",
                    "score": "objectness_least_confidence",
                },
                "strategy": {"type": "WEIGHTS"},
            },
            {
                # strategy to use flickering score (assertion based Active Learning)
                "input": {"type": "METADATA", "key": "flickering"},
                "strategy": {
                    "type": "WEIGHTS",
                },
            },
        ],
    },
    lightly_config={},
)
Analyze the results
Whenever you process a dataset with the LightlyOne Solution, you will have access to the following results:
- A completed LightlyOne Worker run with artifacts such as logs.
- A PDF report that summarizes what data has been selected and why.
- Furthermore, our dataset in the LightlyOne Platform now contains the selected images.
You can find a more detailed version of these metrics in the other YOLOv8 tutorial.
Assertion analysis
Let's look at the LightlyOne Platform at the embedding plot. We can colour our embeddings by flickering score:
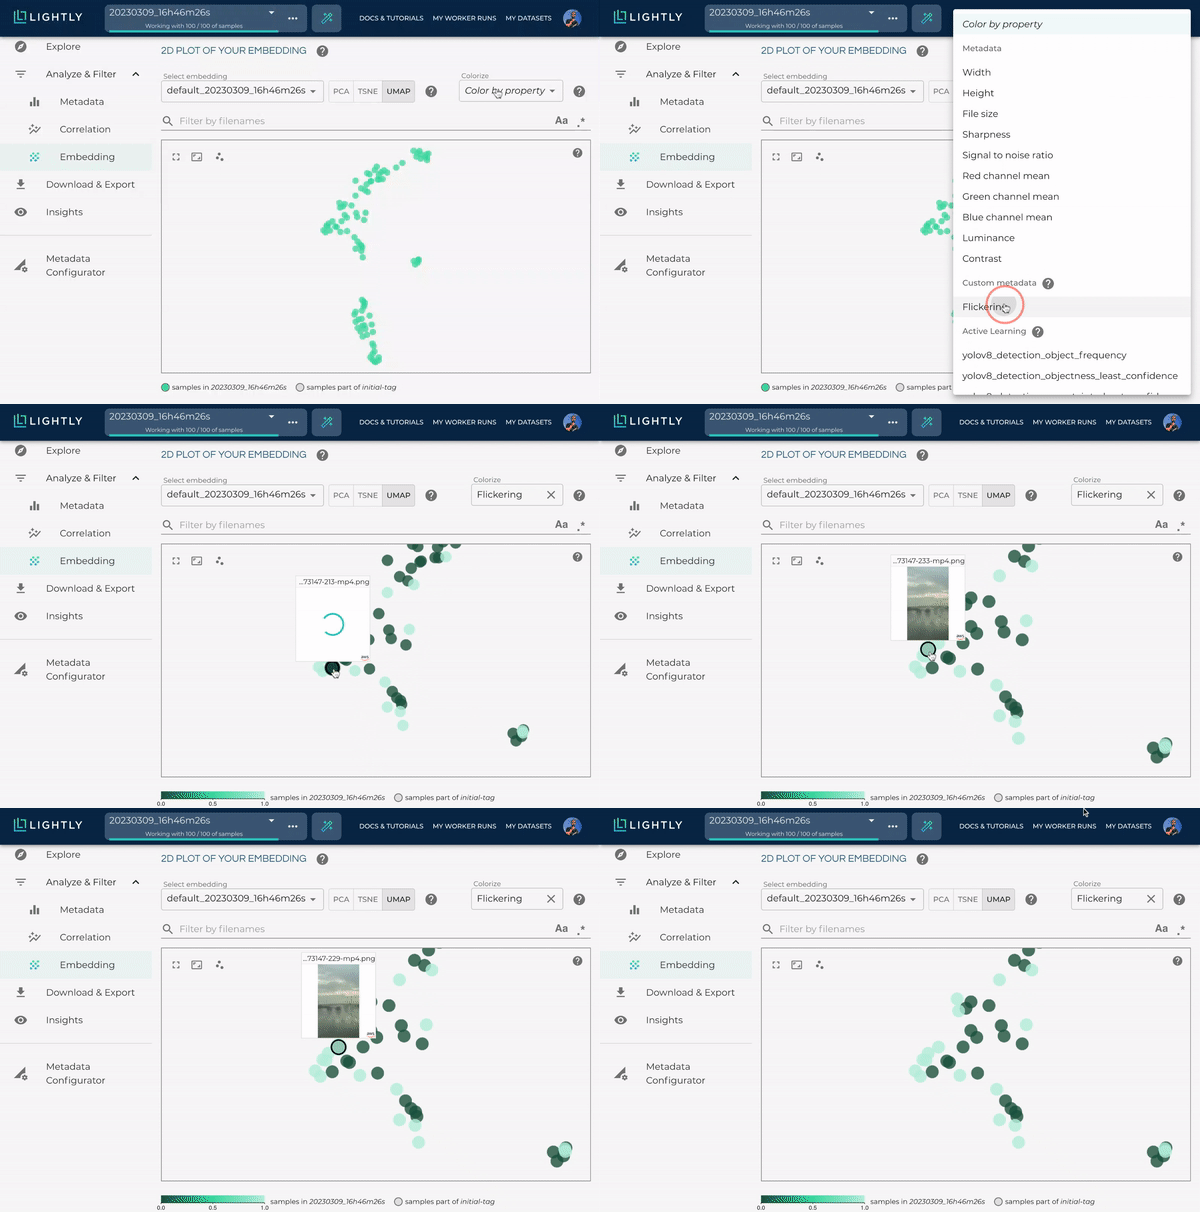
Color embeddings by flickering score
The light green colored samples are the ones with a high flickering score. We can hover with our mouse in the UI to see the filename. As we see frame 233 has prediction flickering.
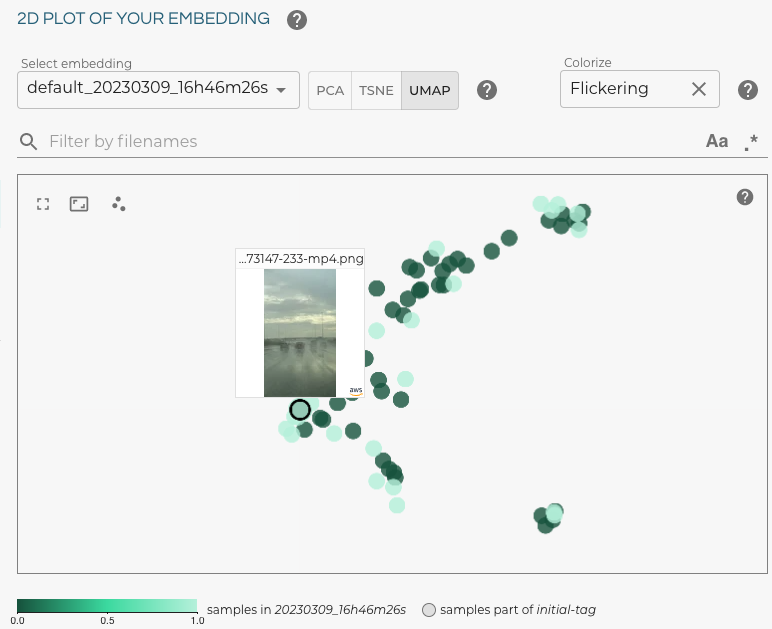
As we can learn from the selected data the frame 233 has a high flickering score. Looking at the frame in more detail we see that indeed a bounding box is flickering.
Let's look at the predictions with the high flickering score to see whether our method worked. We created a tiny gif animation to playback the predictions for frames 232, 233, and 234.
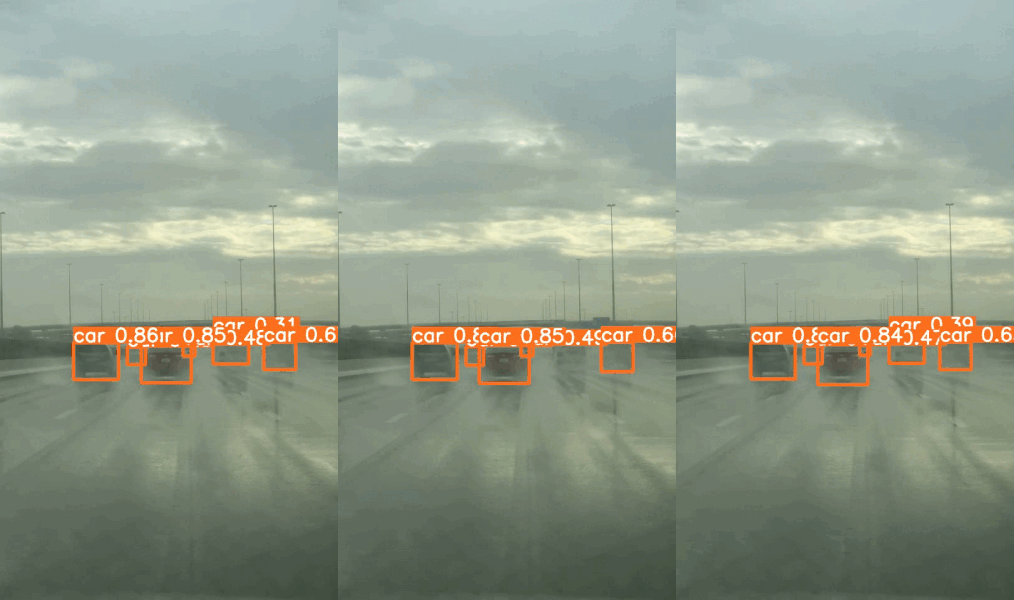
If we loop over predictions for frame 232, 233 and 234 we see that the bounding box for the second car from the right is flickering.
Export the Video Frames for Labeling
If we want to export the selected data for labeling, we want the filenames and the signed URLs to access the frames. The filenames contain the video name and the frame number. But since we just used LightlyOne directly on videos, we would need to extract the frames again to get the data we want for labeling.
Luckily, LightlyOne extracts the data of the selected frames automatically and stores them in the Lightly bucket we defined above. This is the same bucket we used to store metadata and predictions.
from lightly.api import ApiWorkflowClient

# Create the Lightly client to connect to the API.
# You can also combine this with the script above and reuse the client.
client = ApiWorkflowClient(token="MY_LIGHTLY_TOKEN", dataset_id="MY_DATASET_ID")

# get the filenames with signed read URLs
filenames_and_read_urls = client.export_filenames_and_read_urls_by_tag_name(
    tag_name="initial-tag"  # name of the tag in the dataset
)
with open("filenames-and-readurls-of-initial-tag.json", "w") as f:
    json.dump(filenames_and_read_urls, f)
Updated 7 months ago
