
Local Storage
This page explains how to provide data to LightlyOne from your local disk.
Version requirementThis feature requires LightlyOne Worker 2.9 or higher and Lightly Python Client 1.4.16 or higher.
Visit the Installation page to see how you can get the latest versions.
Datasources
Datasource is LightlyOne's name for the input or output location for data. To run LightlyOne, you need to provide two datasources.
Input datasource is the location of your input images or videos. Can be read only.
Lightly datasource is the location of additional Lightly-specific data such as custom metadata or predictions. This datasource is also used for output artifacts such as PDF report or data for LightlyOne Platform functionality such as image thumbnails. Must be writeable.
For more information about the datasources please refer to Cloud Storage page.
Overview
Local data are provided to LightlyOne in three steps:
- When starting LightlyOne Worker, mount your data folders to the docker container
- When scheduling a worker run, specify the location of your data relative to the mounted folders
- Optional: To display your data in LightlyOne Platform, run a local web server
Mount Your Data
LightlyOne Worker recognizes two kinds of local paths. Mount path is a local directory mounted to the docker image. Datasource path is a path within this directory that contains data for your current run. They can be the same, having them different is useful e.g. if you have multiple datasets in a common folder that you would like to process without restarting the docker.
The following shows an example folder structure in your local environment.
/home/user/input/project_A/
├── 0000_0085e9e41513078a_2018-08-19--13-26-08_11_864.png
├── ...
└── 0999_e8e95b54ed6116a6_2018-10-22--11-26-21_3_339.png

/home/user/lightly/project_A/
└── .lightly/predictions/
    ├── tasks.json
    └── yolov7_prediction_task/
          ├── schema.json
          ├── 0000_0085e9e41513078a_2018-08-19--13-26-08_11_864.json
          ├── ...
          └── 0999_e8e95b54ed6116a6_2018-10-22--11-26-21_3_339.json
When starting the docker, the mount path for the Input datasource must be mounted to /input_mount and the mount path for the Lightly datasource must be mounted to /lightly_mount:
Docker requires mount paths to be absolute!
Volume mounting folders to a Docker container can change file permissions of all mounted files. We therefore recommend the following best practice: Choose the mount path as specific as possible while maintaining enough flexibility to access all data of interest. At the end of this chapter you can find a complete example. See mount permissions for more information regarding permissions.
docker run ... \
  -v "/home/user/input/project_A/":/input_mount:ro \
  -v "/home/user/lightly/project_A/":/lightly_mount \
  ...
Set the Datasource
Provide your datasource paths before scheduling your run. The specified paths must be relative to the corresponding mount paths. If your mount path and datasource path coincide pass an empty string.
Optionally, a web server location can be provided, otherwise, it defaults to http://localhost:3456. This is a location where LightlyOne Platform will expect your images to be served.
from lightly.api import ApiWorkflowClient

client = ApiWorkflowClient(token="MY_LIGHTLY_TOKEN")
client.create_dataset(
    dataset_name="dataset-name",
    dataset_type=DatasetType.IMAGES  # can be DatasetType.VIDEOS when working with videos
)
client.set_local_config(
    relative_path="",  # Relative path in the input mount folder (/home/user/input/project_A/)
    web_server_location="http://localhost:3456",  # Optional
    purpose=DatasourcePurpose.INPUT,
)
client.set_local_config(
    relative_path="",  # Relative path in the lightly mount folder (/home/user/lightly/project_A/)
    web_server_location="http://localhost:3456",  # Optional
    purpose=DatasourcePurpose.LIGHTLY,
)When providing data with the Lightly datasource, note that you need to specify the folder that contains the
.lightlysubfolder.
Schedule Your Run
Scheduling the run works the same for local and cloud storage. If you encounter any permission errors in accessing the local storage, head to our FAQ.
from lightly.api import ApiWorkflowClient

scheduled_run_id = client.schedule_compute_worker_run(
    worker_config={},
    selection_config={
        "n_samples": 50,
        "strategies": [
            {"input": {"type": "EMBEDDINGS"}, "strategy": {"type": "DIVERSITY"}}
        ],
    },
)
Optional After Run: View Local Data in LightlyOne Platform
You can inspect the results of your run in LightlyOne Platform. A LightlyOne dataset configured with a local datasource will always try to access images at the web_server_location specified when configuring the datasource. The default is localhost:3456. Furthermore, all read-URLs generated by any of the export features will point to this location.
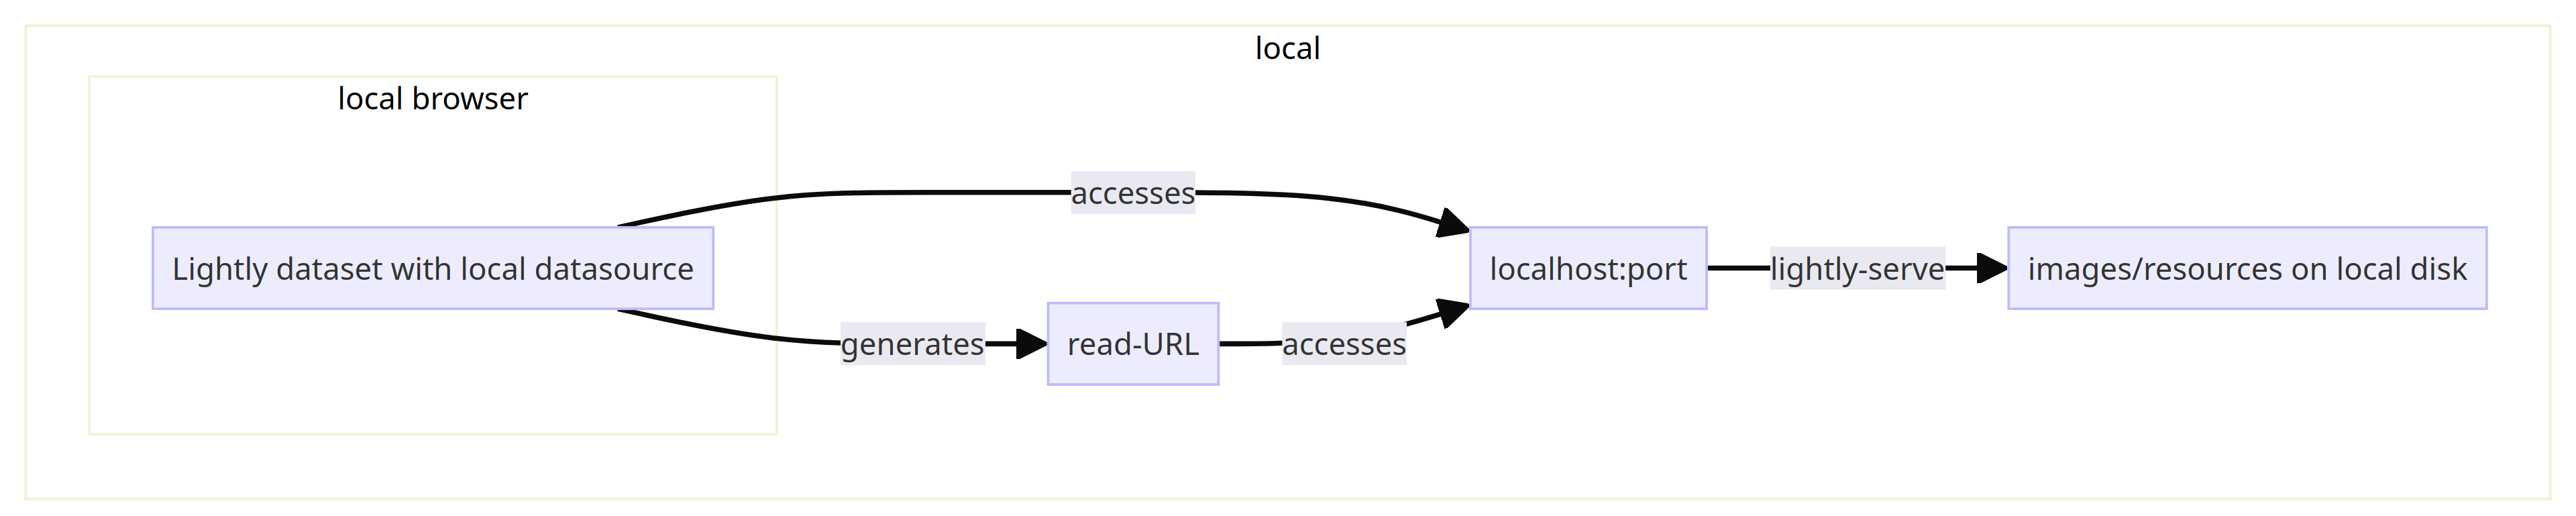
Thus you need to point the localhost:portto your images or resources on your disk. This can be done easily using the lightly-serve CLI command provided by the Lightly Python Client.
# host and port are optional
lightly-serve \
  input_mount="/home/user/input/project_A/" \
  lightly_mount="/home/user/lightly/project_A/" \
  host="localhost" \
  port=3456
The host and port are optional, you only need to change them if you did not use the default web server location when configuring the datasource.
To test if it is working, browse your dataset in the LightlyOne Platform, or directly access localhost:3456 in your browser.
Data PrivacyThe
lightly-servecommand makes the images/resources on your local disk only available to yourlocalhost, i.e. within your local system. Thus, they are not accessible to any application outside your local computer.
View Local Data in Remote Machine in LightlyOne Platform
If your browser runs on your notebook, but you used the local storage on a remote machine, the setup is slightly different:

First, you need to run lightly-serveon the remote machine where the actual images/resources are located. Second, you need to forward the remote port to the local port. E.g. if you use ssh, this can be done with the -Lfeature: ssh -N -L 3456:localhost:3456 [username]@[remote-machine-address]. Or if you use VSCode, you can do it in the ports tab:

View the Local Data Securely Over the Network/VPN
You can host your images/resources from a centralized server by setting web_server_location to something other than http://localhost:3456 (e.g. http://other-host:20000) when configuring the local datasource.
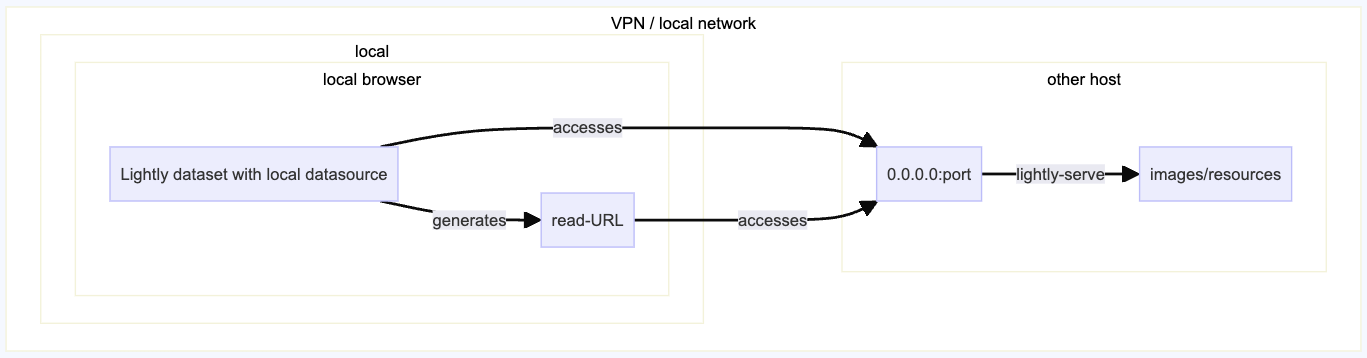
For lightly-serve to listen to hosts other than localhost, you need to specify host=0.0.0.0. This is also applicable when running lightly-serve within a custom docker container.
The LightlyOne Platform runs securely on HTTPS, while lightly-serve only runs via HTTP by default. As this is considered mixed content in modern browsers, they will trigger security warnings and not allow you to access or display any images/resources. To overcome this, you must either:
- Add
app.lightly.aito the list of websites where you allow insecure content. See this guide on how to do so in your browser. - Enable HTTPS for
lightly-serveby passingssl_keyandssl_cert. It's important that the certificate and/or CA (certificate authority) is trusted by your computer/system, as you otherwise will have further warnings.
lightly-serve \
  input_mount="/home/user/input/project_A/" \
  lightly_mount="/home/user/lightly/project_A/" \
  ssl_key="/home/ssl/key.pem" \
  ssl_cert="/home/ssl/cert.pem" \
  host="0.0.0.0" \
  port=20000
Complete Example
This example puts together all the steps needed to run LightlyOne with local data. It assumes that the user wants to process videos stored in /home/user/input/project_A/cam1 and has a Lightly datasource in /home/user/lightly/project_A/cam1.
The local data structure is the following
/home/user/input/project_A/
└── cam1/
    ├── 95b54ed6116a.mp4
    ├── ...
    └── 6116a6e8easd.mp4

/home/user/lightly/project_A/
└── cam1/
    └── .lightly/
To process this dataset we can configure the LightlyOne Worker and schedule a run using the following example:
docker run --shm-size "1024m" --gpus all --rm -it \
  -v "/home/user/input/project_A/":/input_mount:ro \
  -v "/home/user/lightly/project_A/":/lightly_mount \
	-e LIGHTLY_TOKEN="MY_LIGHTLY_TOKEN" \
lightly/worker:latest# Imports
from lightly.api import ApiWorkflowClient
from lightly.openapi_generated.swagger_client import DatasetType
from lightly.openapi_generated.swagger_client import DatasourcePurpose
# Create the LightlyOne client and a dataset
client = ApiWorkflowClient(token="MY_LIGHTLY_TOKEN")
client.create_dataset(
dataset_name="dataset-name",
dataset_type=DatasetType.VIDEOS # Use DatasetType.IMAGES when working with images
)
# Set up your datasources
client.set_local_config(
relative_path="cam1", # Relative path in the input mount folder (/home/user/input/project_A/)
purpose=DatasourcePurpose.INPUT,
)
client.set_local_config(
relative_path="cam1", # Relative path in the lightly mount folder (/home/user/lightly/project_A/)
purpose=DatasourcePurpose.LIGHTLY,
)
# Schedule a run with a basic diversity selection strategy
scheduled_run_id = client.schedule_compute_worker_run(
selection_config={
"n_samples": 10,
"strategies": [
{"input": {"type": "EMBEDDINGS"}, "strategy": {"type": "DIVERSITY"}}
],
},
)
print(scheduled_run_id)lightly-serve input_mount="/home/user/input/project_A/" lightly_mount="/home/user/lightly/project_A/"Updated 8 months ago