Improving YOLOv8 using Active Learning on Videos
Learn how to use active learning directly on videos to extract only the most relevant frames for labeling and re-training your model.
Video cameras are the protagonists of many computer vision applications. It can be robotics or handling security applications: we are dealing with a stream of frames. We need to find relevant data to label and include in the training pipeline to improve the models. Since we don't want to label complete videos (it would be too expensive), a naive approach would be to extract frames at a certain framerate. E.g., if we have a 100-second video clip at 30 fps and extract the frames at one fps, we end up with 100 instead of 3000 frames. By doing so, we already reduce the amount of data to be labeled. However, because we only considered 1 out of 30 frames, we might have missed some really important ones that could improve our model.
We want to use LightlyOne to select 100 frames for labeling in this example. The images should be distributed across the videos if possible. We want to focus on images with many difficult objects that will most likely improve our model during training.
Active Learning using Videos
LightlyOne allows you to consider model predictions, embeddings, and metadata for all video frames while only extracting the relevant frames. This allows you to get the maximal value for improving your model while keeping the costs at a minimum and not having to mingle with tons of extracted frames in your storage. This tutorial shows you how to get this done using the YOLOv8 model.
You will learn the following in this tutorial:
- Running model predictions directly on videos and converting the predictions into the Lightly format.
- Working with metadata to ensure we balance the selected data across the videos.
- How to change the corruptness check sensitivity.
- How to automate this pipeline and repeat it for new videos.
Prerequisites
To upload predictions to a Lightly datasource, you will need the following things:
- Have LightlyOne installed and setup.
- Access to a cloud bucket to which you can upload your dataset. The following tutorial will use an AWS S3 bucket.
- To use the YOLOv7 model, you can look at the official GitHub repository.
- The EPFL Multi-camera pedestrians video
- We recommend using
Python 3.7or newer.
Download the Multi-camera Pedestrians Dataset
We can download the dataset using the following shell commands.
mkdir data && cd data
wget https://documents.epfl.ch/groups/c/cv/cvlab-pom-video2/www/passageway1-c0.avi
wget https://documents.epfl.ch/groups/c/cv/cvlab-pom-video3/www/terrace1-c0.avi
wget https://documents.epfl.ch/groups/c/cv/cvlab-pom-video3/www/terrace1-c2.avi
Let's check the first frame of one of the videos to get an idea of what we're dealing with. We can extract the frame using a tool like ffmpeg.
Extract the first frame with:
ffmpeg -i data/passageway1-c0.avi -ss 0 -vframes 1 first_frame.jpgAfter running the command, you should have a new file in the folder called first_frame.jpg.
data/
├── passageway1-c0.avi
├── terrace1-c0.avi
└── terrace1-c2.avi
first_frame.jpg
If you open first_frame.jpg in an image viewer you should see something similar to the image below:

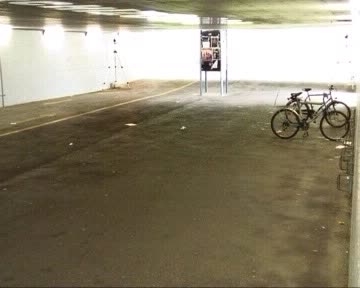
Image showing the first frame of passageway1-c0.avi obtained using the ffmpeg command above. As you notice, there's just a bicycle in the scene.
Get Video Predictions using YOLOv8
To get predictions we first need to have a model. We can install the new YOLOv8 model directly using pip. And while doing that, we can also install lightly within the same shell command:
pip install ultralytics lightly
Package VersionsWe tested this tutorial using a
Python 3.10environment and the following package versionsultralytics==8.0.25 lightly==1.2.44
Now, let's get predictions for one of our videos. The YOLOv8 model has a very simple interface. We instantiate the class, and the model automatically downloads a checkpoint (trained on MS COCO). We can use the .predict(...) method of the YOLO class to get predictions.
Finally, we can iterate over the results and add them to a list of predictions.
Since we want to improve our existing model, we want to work with a much lower confidence threshold (we set it to 0.1 instead of 0.25, which is the default) as this can help us find potential false negatives to be included in the next labeling iteration.
from ultralytics import YOLO

# load our yolo model (we load the largest one, yolov8x)
model = YOLO("yolov8x.pt")

results = model.predict('data/passageway1-c0.avi', conf=0.1)

predictions = []
for result in results:
    predictions.append(result.boxes.boxes)

print(predictions[0])
If we look at the first prediction, we notice that the format matches the one of YOLOv7 we use in another tutorial:
[x_min, y_min, x_max, y_max, conf, class_index]
array([[        271,          85,         351,         141,     0.88721,           1],
       [        287,          85,         351,         120,     0.13391,           1]], dtype=float32)
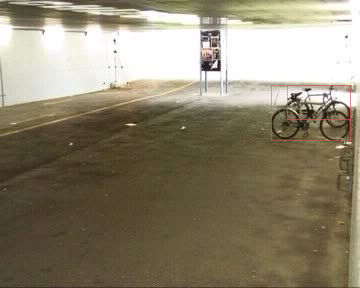
Let's have a look at the prediction for the first frame. The first bounding box is covering both bicycles. It also has a higher prediction probability with 88.7%. The second bounding box is the bicycle in the back and has a very low prediction probability of only 13.4%.

We show the prediction of our YOLOv8 model on the first frame. As you see the model found both bicycles.
To figure out the label of the prediction based on the class index, we can have a look at the list here.
We see that our model classified the two bicycles indeed as bicycle as they have index 1.
Get predictions for all videos
To use the predictions in the LightlyOne data curation pipeline, we need to convert them to the right format. You can learn more about the prediction format in our other docs section. We summarize here the most important points when working with object detection and videos.
- The filename of the json prediction should match this format:
{VIDEO_NAME}-{FRAME_NUMBER}-{VIDEO_EXTENSION}.json
{
    "predictions": [
        {
            "category_id": 1,           // category in [0, num categories - 1]
            "bbox": [271, 85, 80, 56],  // x, y, w, h coordinates in pixels
                                        // x, y >= 0 and w, h >= 1
            "score": 0.88721,           // score is our prediction probability in [0, 1]
        },
        {
            "category_id": 1,
            "bbox": [287, 85, 64, 35],
            "score": 0.13391,
        }
    ]
}
We can now create a small script that creates the tasks.json file, a schema.json and the predictions for all the videos.
from ultralytics import YOLO
from pathlib import Path
import json

model = YOLO("yolov8x.pt")  # load a pretrained model (recommended for training)

predictions_rooth_path = Path("predictions")
task_name = "yolov8_detection"
predictions_path = Path(predictions_rooth_path / task_name)

important_classes = {"person": 0, "bicycle": 1, "car": 2}

classes = list(important_classes.values())

# create tasks.json
tasks_json_path = predictions_rooth_path / "tasks.json"
tasks_json_path.parent.mkdir(parents=True, exist_ok=True)

with open(tasks_json_path, "w") as f:
    json.dump([task_name], f)


# create schema.json
schema = {"task_type": "object-detection", "categories": []}
for key, val in important_classes.items():
    cat = {"id": val, "name": key}
    schema["categories"].append(cat)

schema_path = predictions_path / "schema.json"
schema_path.parent.mkdir(parents=True, exist_ok=True)

with open(schema_path, "w") as f:
    json.dump(schema, f, indent=4)


videos = Path("data/").glob("*.avi")

for video in videos:
    results = model.predict(video, conf=0.1)
    predictions = [result.boxes.boxes for result in results]

    # convert filename to lightly format
    # 'data/passageway1-c0.avi' --> 'data/passageway1-c0-0001-avi.json'
    number_of_frames = len(predictions)
    padding = len(str(number_of_frames))  # '1234' --> 4 digits
    fname = video

    for idx, prediction in enumerate(predictions):
        fname_prediction = (
            f"{fname.parents[0] / fname.stem}-{idx:0{padding}d}-{fname.suffix[1:]}.json"
        )

        # treats extracted frames from videos as PNGs
        lightly_prediction = {
            "predictions": [],
        }

        for pred in prediction:
            x0, y0, x1, y1, conf, class_id = pred

            # skip predictions thare are not part of the important_classes
            if class_id in important_classes.values():
                # note that we need to conver form x0, y0, x1, y1 to x, y, w, h format
                pred = {
                    "category_id": int(class_id),
                    "bbox": [int(x0), int(y0), int(x1 - x0), int(y1 - y0)],
                    "score": float(conf),
                }
                lightly_prediction["predictions"].append(pred)

                # create the prediction file for the image
                path_to_prediction = predictions_path / Path(
                    fname_prediction
                ).with_suffix(".json")

                path_to_prediction.parents[0].mkdir(parents=True, exist_ok=True)
                with open(path_to_prediction, "w") as f:
                    json.dump(lightly_prediction, f, indent=4)
Metadata
Now that we have predictions, we still need some way of balancing the selected frames across the videos. We can use metadata for that.
LightlyOne also supports working with metadata. Typically, we could use additional sensor values, environmental conditions, or system identifiers. For this example, we will use the video filename as metadata. This will allow us to balance the curated dataset across the videos. Having again thousands of json files for the predictions seems cumbersome but doable. But luckily, LightlyOne supports directly providing metadata on a per-video basis. Any video frame will inherit the metadata we provide for the video itself.
{
    "type": "video",
    "metadata": {
        "video_name": "passageway1-c0"
    }
}
We can write another small script to generate the metadata schema.json and other files.
from pathlib import Path
import json

# create metadata schema.json
schema = [
    {
        "name": "Video Name",
        "path": "video_name",
        "defaultValue": "undefined",
        "valueDataType": "CATEGORICAL_STRING",
    }
]

schema_path = Path("metadata/schema.json")
schema_path.parent.mkdir(parents=True, exist_ok=True)

with open(schema_path, "w") as f:
    json.dump(schema, f, indent=4)

videos = Path("data/").glob("*.avi")

for fname in videos:
    metadata = {
        "type": "video",
        "metadata": {"video_name": str(fname.stem)},
    }

    lightly_metadata_fname = "metadata" / fname.with_suffix(
        ".json"
    )
    lightly_metadata_fname.parent.mkdir(parents=True, exist_ok=True)

    with open(lightly_metadata_fname, "w") as f:
        json.dump(metadata, f, indent=4)
Upload data to your cloud storage
You should now have a folder structure that looks more or less like this:
data/
├── passageway1-c0.avi
├── terrace1-c0.avi
└── terrace1-c2.avi
predictions/
├── tasks.json
└── yolov8_detection/
		├── data/
    |   ├── passageway1-c0-0000-avi.json
    |   ├── ...
    |   └── terrace1-c0-4834-avi.json
		└── schema.json
metadata/
├── data/
|   ├── passageway1-c0.json
|   ├── terrace1-c0.json
|   └── terrace1-c2.json
└── schema.json
first_frame.jpg
What's left is uploading the data to cloud storage so LightlyOne can process it. In this example, we use AWS S3 but LightlyOne is also compatible with Azure or Google Cloud Storage.
aws s3 cp data/ s3://bucket/input/pedestrians/data/ --recursive
aws s3 cp predictions/ s3://bucket/lightly/pedestrians/.lightly/predictions --recursive
aws s3 cp metadata/ s3://bucket/lightly/pedestrians/.lightly/metadata --recursive
In the S3 bucket the structure should now look like the following. Note that we have two folders, one for the input data (the videos) and one for lightly (where we have predictions and metadata). We separate these two because LightlyOne also uses the second bucket to store temporary information such as thumbnails or extracted frames.
s3://bucket/input/pedestrians/
└── data/
        ├── passageway1-c0.avi
        ├── terrace1-c0.avi
        └── terrace1-c2.avi

s3://bucket/lightly/pedestrians/
└── .lightly/
        predictions/
        ├── tasks.json
        └── yolov8_detection/
            ├── data/
            |   ├── passageway1-c0-0000-avi.json
            |   ├── ...
            |   └── terrace1-c0-4834-avi.json
            └── schema.json
        metadata/
        ├── data/
        |   ├── passageway1-c0.json
        |   ├── terrace1-c0.json
        |   └── terrace1-c2.json
        └── schema.json
Process the dataset
We have all the data (images + metadata + predictions) synced in our cloud bucket and can start with the processing. LightlyOne is designed to have a processing engine, the LightlyOne Worker, running in a docker container. You can just run the following command on a machine with a GPU to start the worker.
docker run --shm-size="1024m" --gpus all --rm -it \
	  -e LIGHTLY_TOKEN={MY_LIGHTLY_TOKEN} \
	  lightly/worker:latest \
Once the worker is up and running, we can create a job to process our data. We follow the other tutorials and create a simple Python script to perform these steps:
- Instantiate a LightlyOne client and authenticate it using the token
- Create a datasource to connect to our S3 buckets
- Schedule the run based on our data selection criteria
from lightly.api import ApiWorkflowClient
from lightly.openapi_generated.swagger_client import DatasetType
from lightly.openapi_generated.swagger_client import DatasourcePurpose


# Create the LightlyOne client to connect to the API.
client = ApiWorkflowClient(token="MY_LIGHTLY_TOKEN")

# Create a new dataset on the LightlyOne Platform.
client.create_dataset(dataset_name="pedestrian-yolov8", dataset_type=DatasetType.VIDEOS)
dataset_id = client.dataset_id

# Configure the Input datasource.
client.set_s3_delegated_access_config(
    resource_path="s3://bucket/input/pedestrians/",
    region="eu-central-1",
    role_arn="S3-ROLE-ARN",
    external_id="S3-EXTERNAL-ID",
    purpose=DatasourcePurpose.INPUT,
)
# Configure the Lightly datasource.
client.set_s3_delegated_access_config(
    resource_path="s3://bucket/lightly/pedestrians/",
    region="eu-central-1",
    role_arn="S3-ROLE-ARN",
    external_id="S3-EXTERNAL-ID",
    purpose=DatasourcePurpose.LIGHTLY,
)

scheduled_run_id = client.schedule_compute_worker_run(
    worker_config={},
    selection_config={
        "n_samples": 100,
        "strategies": [
            {
              	# strategy to find diverse objects
                "input": {
                    "type": "EMBEDDINGS",
                    "task": "yolov8_detection",
                },
                "strategy": {
                    "type": "DIVERSITY",
                },
            },
            {
              	# strategy to balance the class ratios
                "input": {
                    "type": "PREDICTIONS",
                    "name": "CLASS_DISTRIBUTION",
                    "task": "yolov8_detection",
                },
                "strategy": {
                    "type": "BALANCE",
                    "target": {
                        'person': 0.33,
                        'bicycle': 0.34,
                        'car': 0.33,
                    }
                },
            },
            {
              	# strategy to use prediction score (Active Learning)
                "input": {
                    "type": "SCORES",
                    "task": "yolov8_detection",
                  	"score": "object_frequency"
                },
                "strategy": {
                    "type": "WEIGHTS"
                },
            },
            {
              	# strategy to use prediction score (Active Learning)
                "input": {
                    "type": "SCORES",
                    "task": "yolov8_detection",
                  	"score": "objectness_least_confidence"
                },
                "strategy": {
                    "type": "WEIGHTS"
                },
            },
            {
              	# strategy to balance across videos
                "input": {
                    "type": "METADATA",
                    "key": "video_name"
                },
                "strategy": {
                    "type": "BALANCE",
                    "target": {
                        "passageway1-c0": 0.34,
                        "terrace1-c0": 0.33,
                        "terrace1-c2": 0.33,
                    }

                },
            }
        ],
    },
    lightly_config={}
)
Analyze the Results
Whenever you process a dataset with the LightlyOne Solution, you will have access to the following results:
- A completed LightlyOne Worker run with artifacts such as model checkpoints and logs.
- A PDF report that summarizes what data has been selected and why.
- Furthermore, our dataset in the LightlyOne Platform now contains the selected images.
Insights about the input/ output data distribution
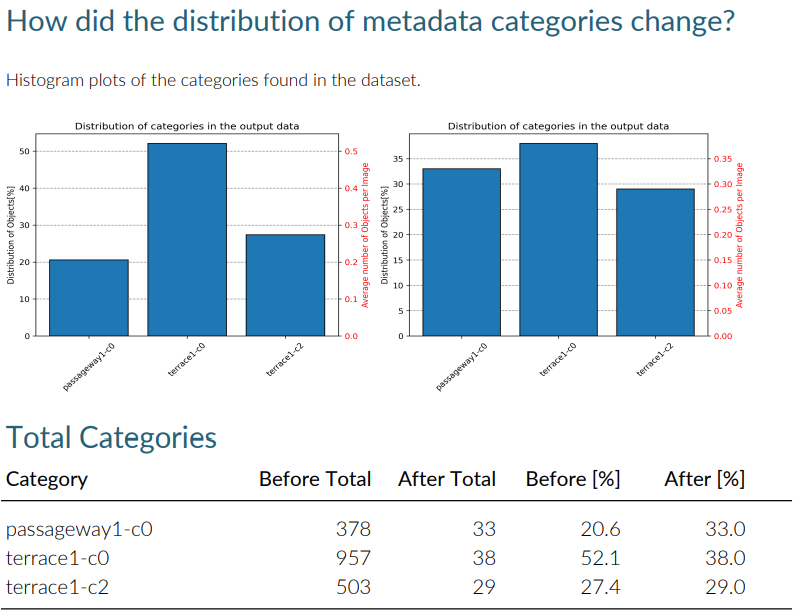
The PDF report contains insights about the metadata distribution.

As you notice the balancing worked as expected. LightlyOne was able to select images from all the videos in an equal amount.
Which Video Frames are Important?
When working with videos, we want to understand which frames have been selected and why. The results of a run help you answer these questions by providing you with insights about the selected data.
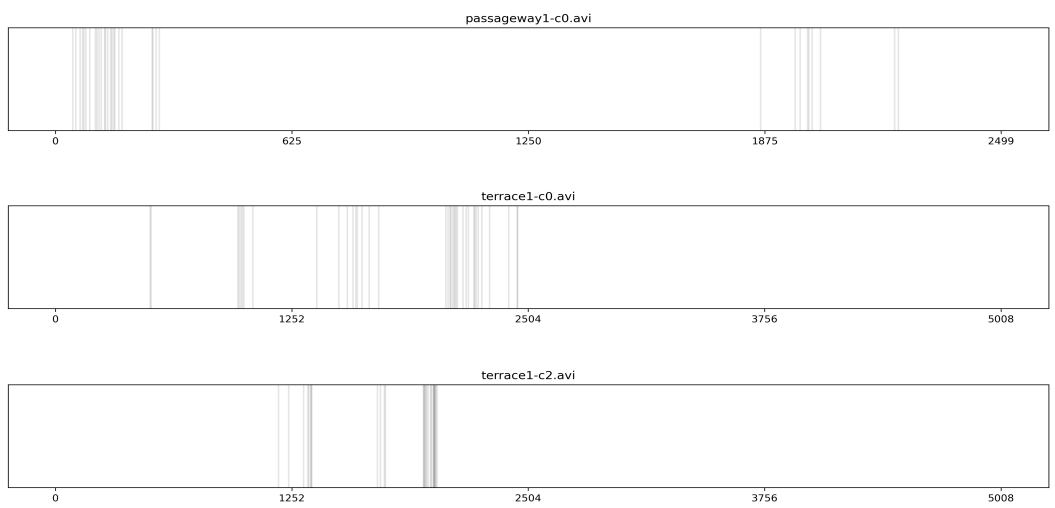
For example, when working with videos, you find in the PDF report a plot showing which frames have been selected. If you just relied on random sampling or sampling based on fixed framerate (e.g., 1 frame every 2 seconds), you would have a very regular pattern. However, as you see, our combined criteria of what data we're looking for results in a much more irregular plot. This is because some of the scenes are "boring" for our model. Either the same person walks around, or nothing interesting happens.
The prediction probability stays high, and the semantics of the scene doesn't change. No need to select this data. But then, there are some very interesting events where our model might be struggling more and we don't want to miss out on them.

In the pdf report of the run you find a plot about the video sampling densities. Every vertical line is frame that has been selected.
Export the Video Frames for Labeling
If we want to export the selected data for labeling, we want the filenames and the signed URLs to access the frames. The filenames contain the video name and the frame number. But since we just used LightlyOne directly on videos, we would need to extract the frames again to get the data we want for labeling.
Luckily, LightlyOne extracts the data of the selected frames automatically and stores them in the LightlyOne bucket we defined above. This is the same bucket we used to store metadata and predictions.
from lightly.api import ApiWorkflowClient

# Create the LightlyOne client to connect to the API.
# You can also combine this with the script above and reuse the client.
client = ApiWorkflowClient(token="MY_LIGHTLY_TOKEN", dataset_id="MY_DATASET_ID")

# get the filenames with signed read URLs
filenames_and_read_urls = client.export_filenames_and_read_urls_by_tag_name(
    tag_name="initial-tag"  # name of the tag in the dataset
)
with open("filenames-and-readurls-of-initial-tag.json", "w") as f:
    json.dump(filenames_and_read_urls, f)
Updated 7 months ago
